Thredd Portal FAQs
This section provides answers to questions on Thredd Portal.
Overview
Thredd Portal is a web-based application that enables programme managers to manage their cards business. This include Thredd Portal: Cards and Transaction Management, where they can manage the full lifecycle of their customer's transactions and card usage. Card programme users can use card and transaction management functions through its interface.
Using Thredd Portal, you can display details about card activity, transaction types, customer interactions and drill down into the details of specific transactions from a vast dataset. You can also alter card statuses, update card usage groups, load funds and adjust the balance.
Thredd Portal users include Customer Support Agents who can update details of a cardholder's account, view transactions, and change card statuses. Users of Thredd Portal also include Programme Managers who can perform all the functions of regular Customer Support Agents, but can also load and unload cards, edit card details, transfer and adjust balances.
Your company's Organisation Administrator must first set up your account under a specific user role, and enable you to access Thredd Portal through Single Sign On (SSO). SSO ensures that you can log in to the Thredd Portal without needing to enter a password.
When your account is ready, the Organisation Administrator will send a link to your email address. Click the link to sign on.
Your company's Organisation Administrator would have assigned you with one of the following roles in Thredd Portal. These include:
|
Role |
Permissions |
|---|---|
|
Admin |
Full access to Thredd Portal. |
|
Manager |
|
|
Read-Only User |
|
|
Card Operations Specialist |
|
|
Card Configuration Manager |
|
|
Card Balance Manager |
|
Cards and Transaction Management in Thredd Portal has been set up with the same ‘Cards and Transaction’ functionality as Smart Client. Thredd Portal: Cards and Transaction Management, unlike Smart Client, uses a web-based interface.
A transaction shows as soon as a cardholder for your programme has made a card transaction at a merchant.
Yes, Thredd Portal: Cards and Transaction Management supports Multi-FX (or MFX) cards, which contain more than one wallet of different currencies. Multi-FX cards allows cardholders to manage and transact in different currencies.
- From the Home page, if you know the token number, click Token ID and enter it. Then Click Search.
- To perform an advanced card holder search, from the Home page, click Advanced Search. The Cards and Transaction Search page appears.
- Enter the First Name and Last Name of the cardholder with any of the following additional details:
- Phone
- Date of Birth
- Address Line 1
- Postcode
- Card Status
- Product Name
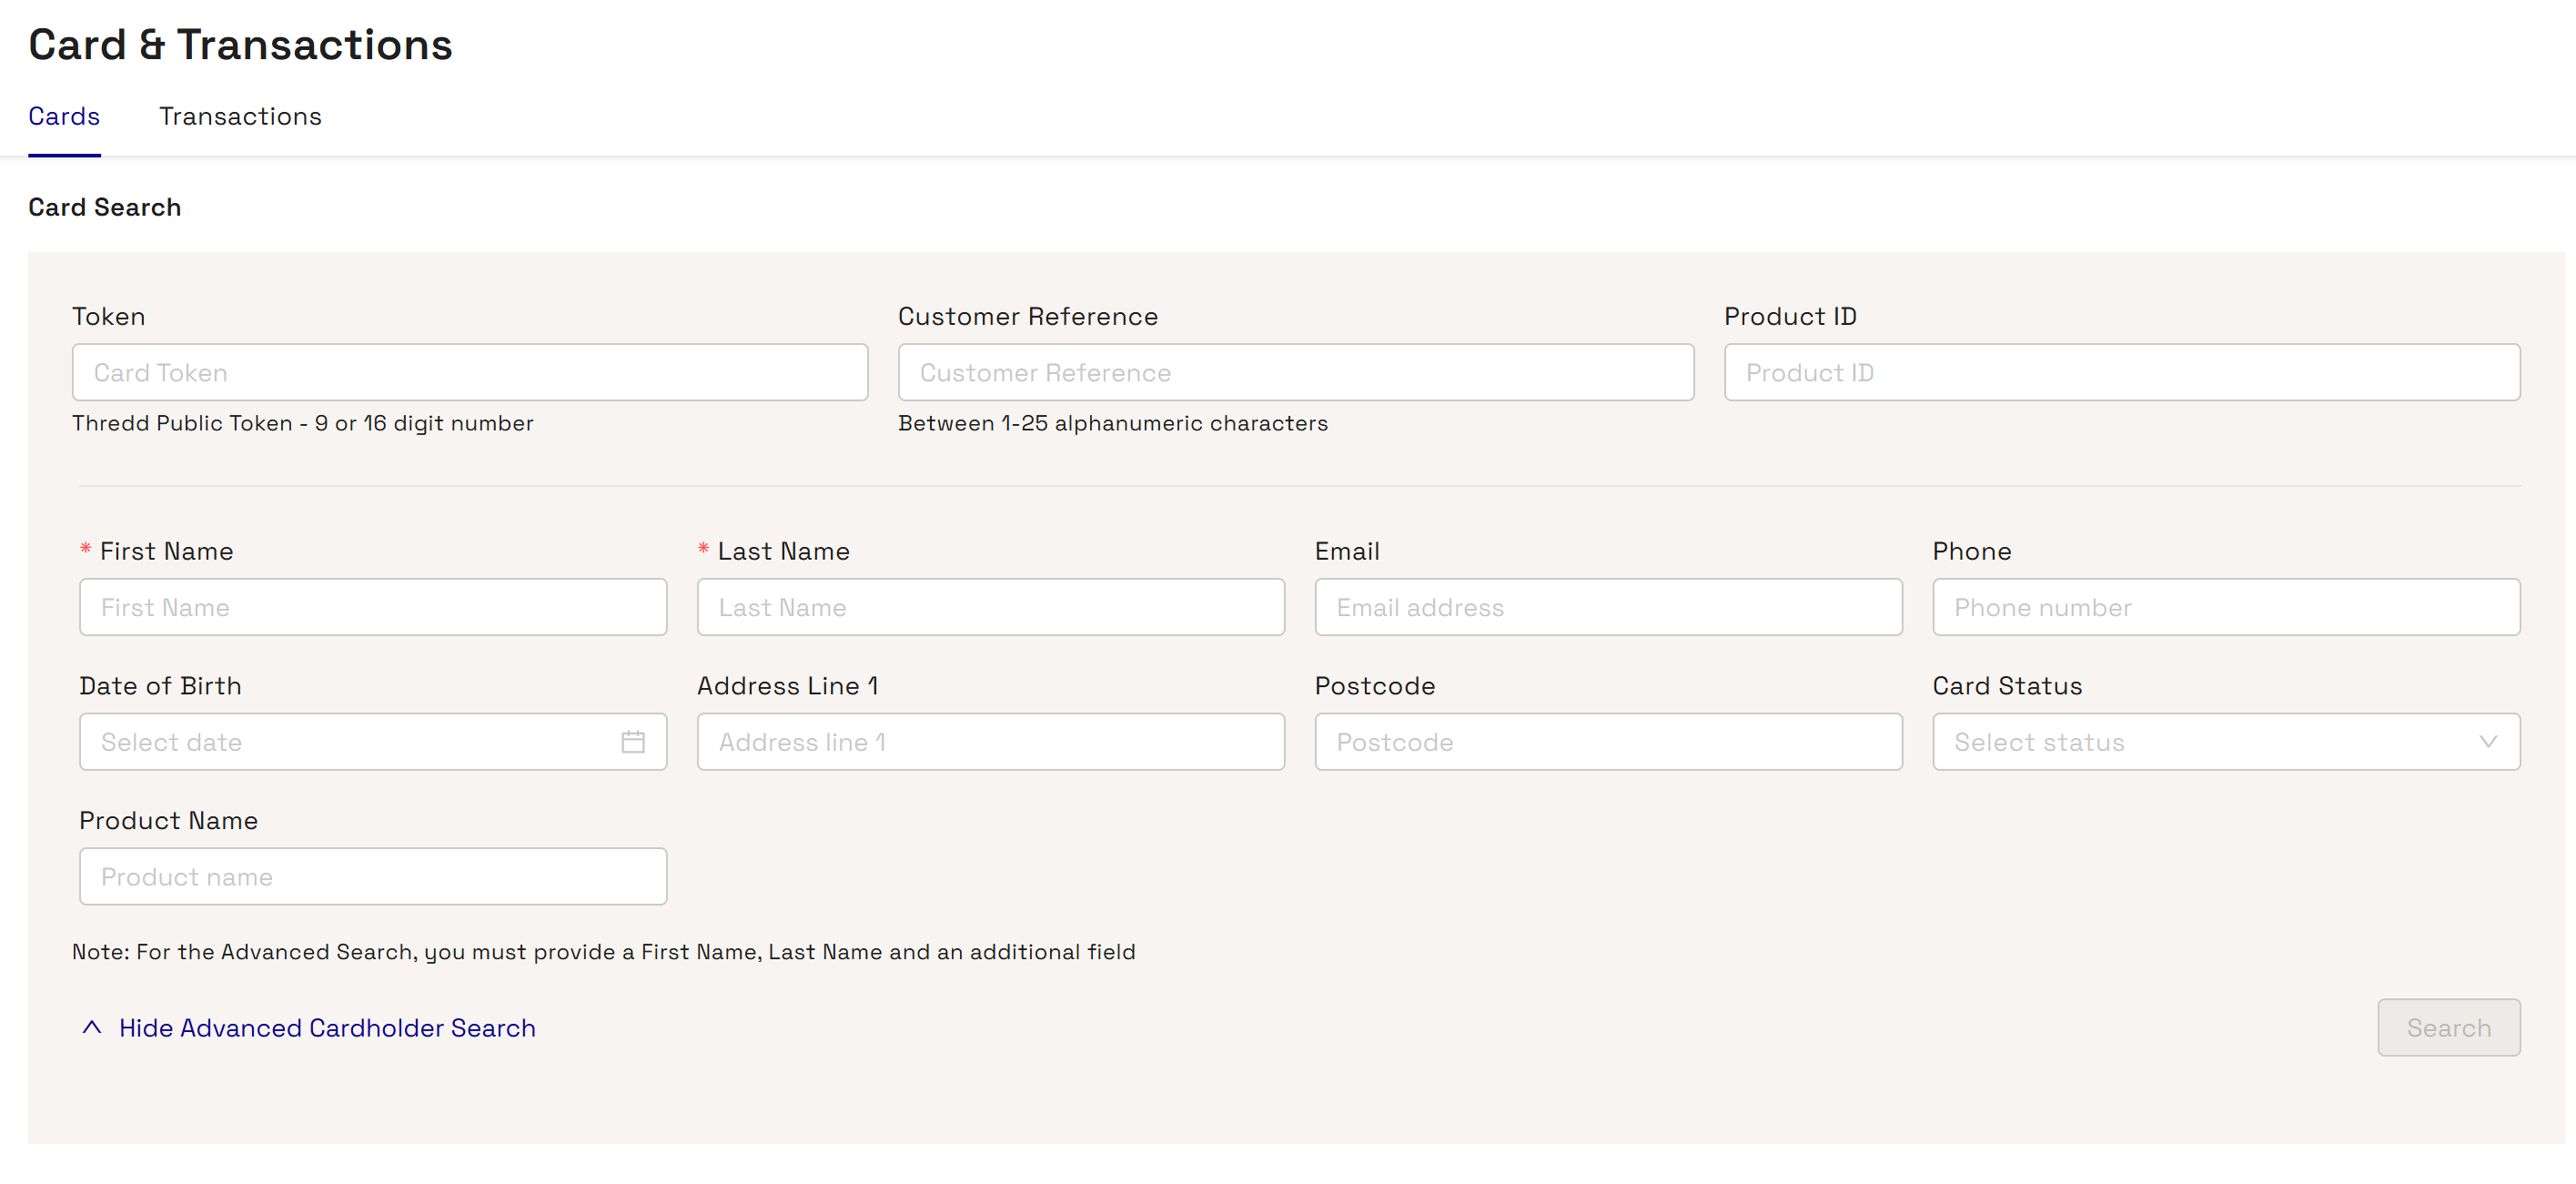
- Click Search. One or more search results appear.
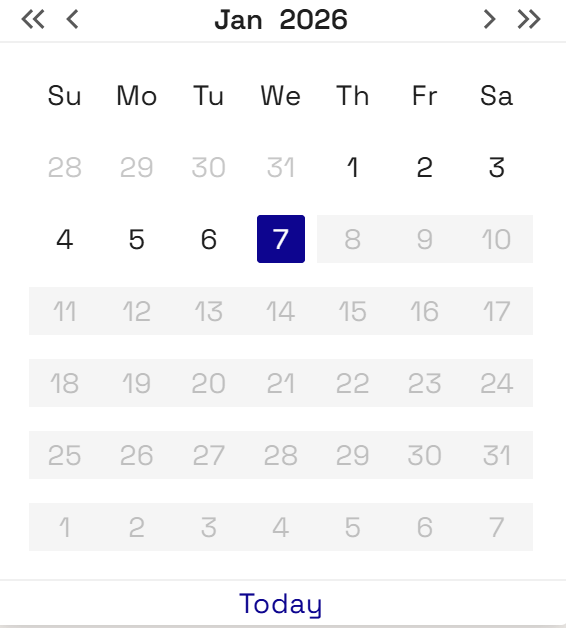
You can search a transaction from a given day and/or filter through an advanced search.
-
From the Home page. click Advanced Search.
-
Click the Transactions tab.
-
Find transactions on a specific day by clicking Date and using the date picker.
-
Click Search.
![]()
You can find details of your user profile information on the top-right of the dashboard homepage, as indicated by Thredd's pattern icon.
![]()
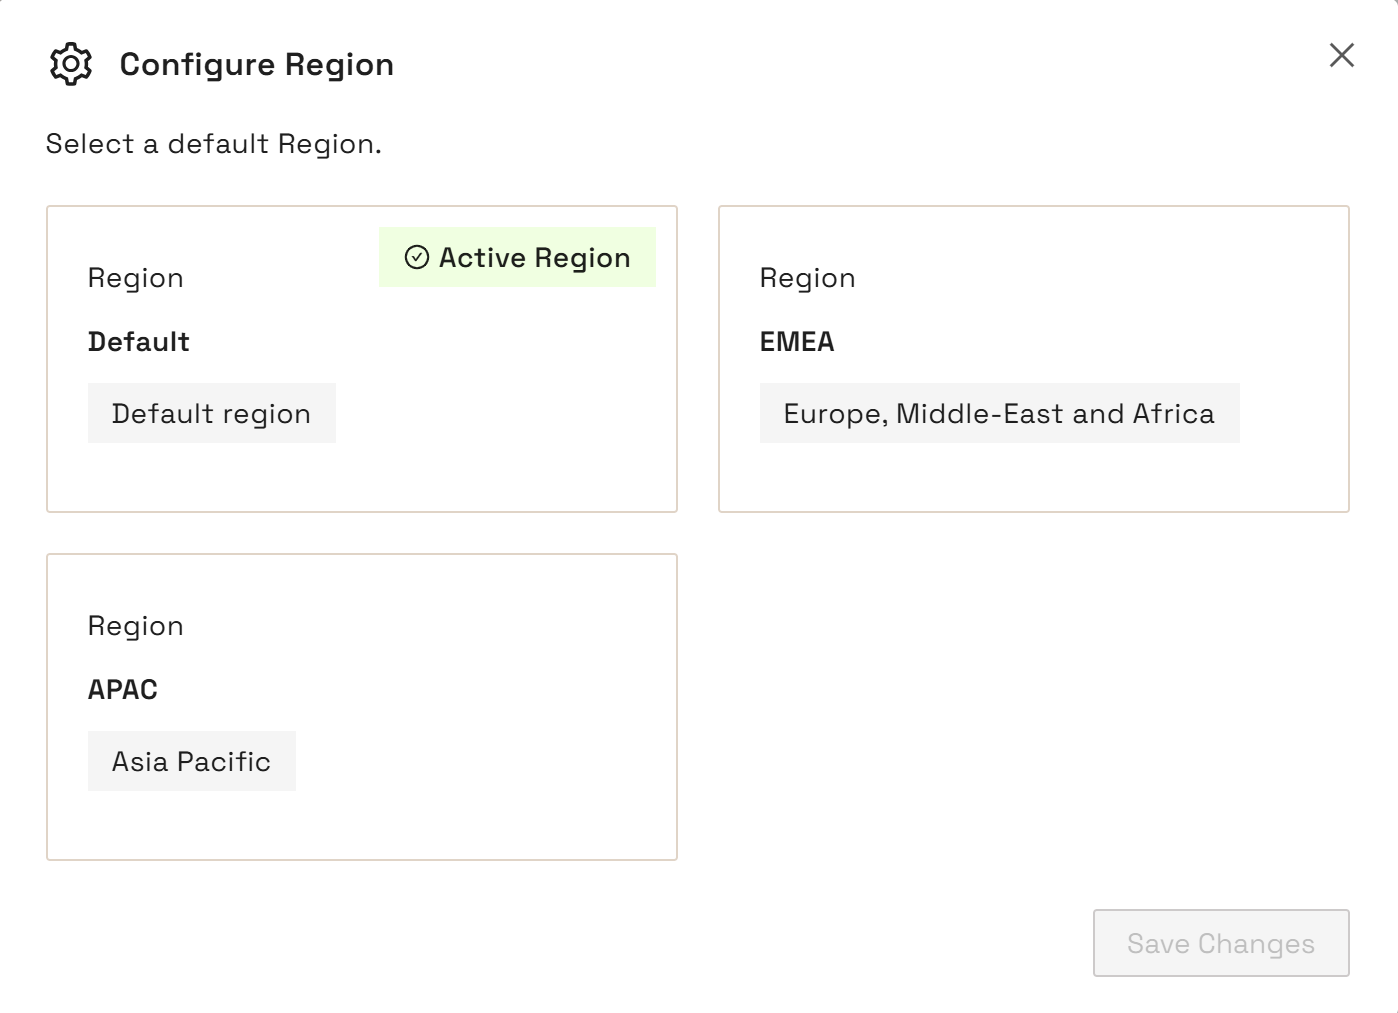
You can configure the server to provide search results relevant to your region.
-
Click your user profile icon.
-
Choose the Configure Region option from the pop-up menu.
-
Click Default. The Configure Region screen appears with the currently selected region as the Active region.
-
In the Configure Region screen, select the region that you want to connect to.
-
Click Save.
To ensure that you remain in the same region for the login session, make sure you use the same browser session and do not clear the browser cache.
You can use both Thredd Portal and the Thredd APIs to manage card functions. When using APIs, you can choose between the Thredd API (SOAP) as well as the Cards API (REST).
You can find more information on Thredd Portal in various sections of this user guide. Other information is available in docs.thredd.com, including technical information in the EHI guides.
Thredd Portal has been designed with users in mind - which makes it easy and intuitive to access and learn. It should not require additional training. However, if you have training requirements, reach out to an Account Manager to discuss further.
Cardholder Details
This section provides overview information on how cardholder details work within Thredd Portal. This is essential for helping you to find information on your cardholders. For more detailed information on using cardholder details, refer to the Searching for a Card and Viewing Card Details.
- From the Home page, if you know the token number, click Token ID and enter it. Then Click Search.
- To perform an advanced card holder search, from the Home page:
- Click Advanced Search.
- Enter the First Name and Last Name of the cardholder with any of the following details:
- Phone
- Date of Birth
- Address Line 1
- Postcode
- Card Status
- Product Name
- Click Search The search results display.
-
From the list of matching cards, click the required card to display the summary of card information.
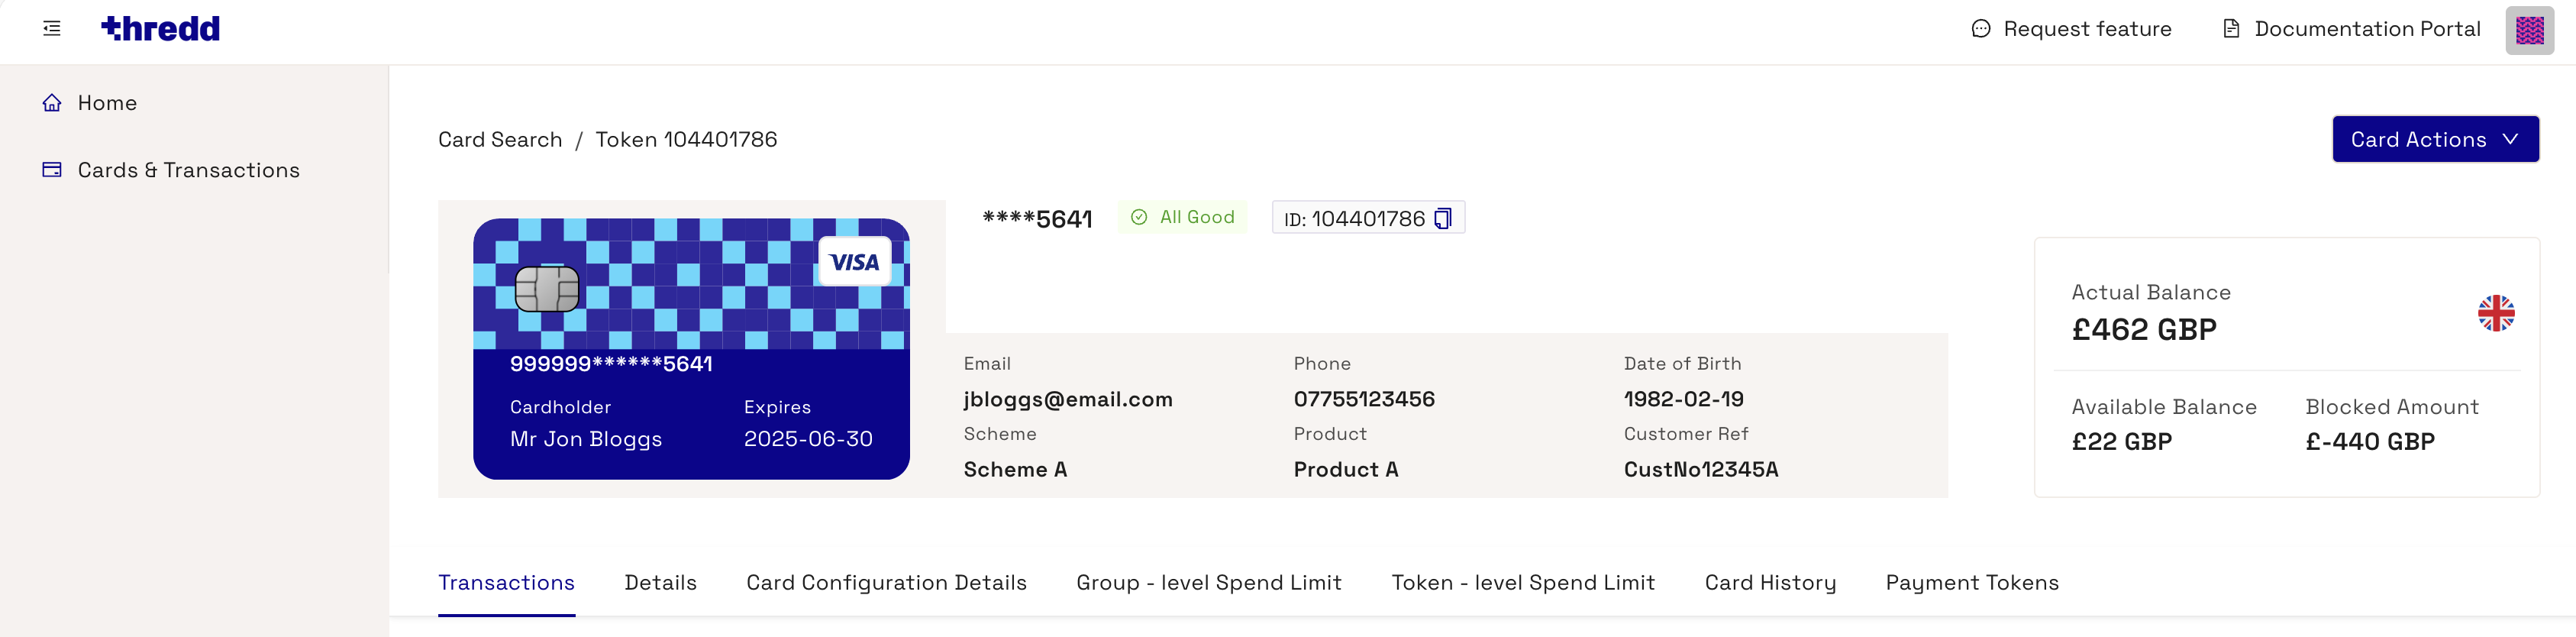
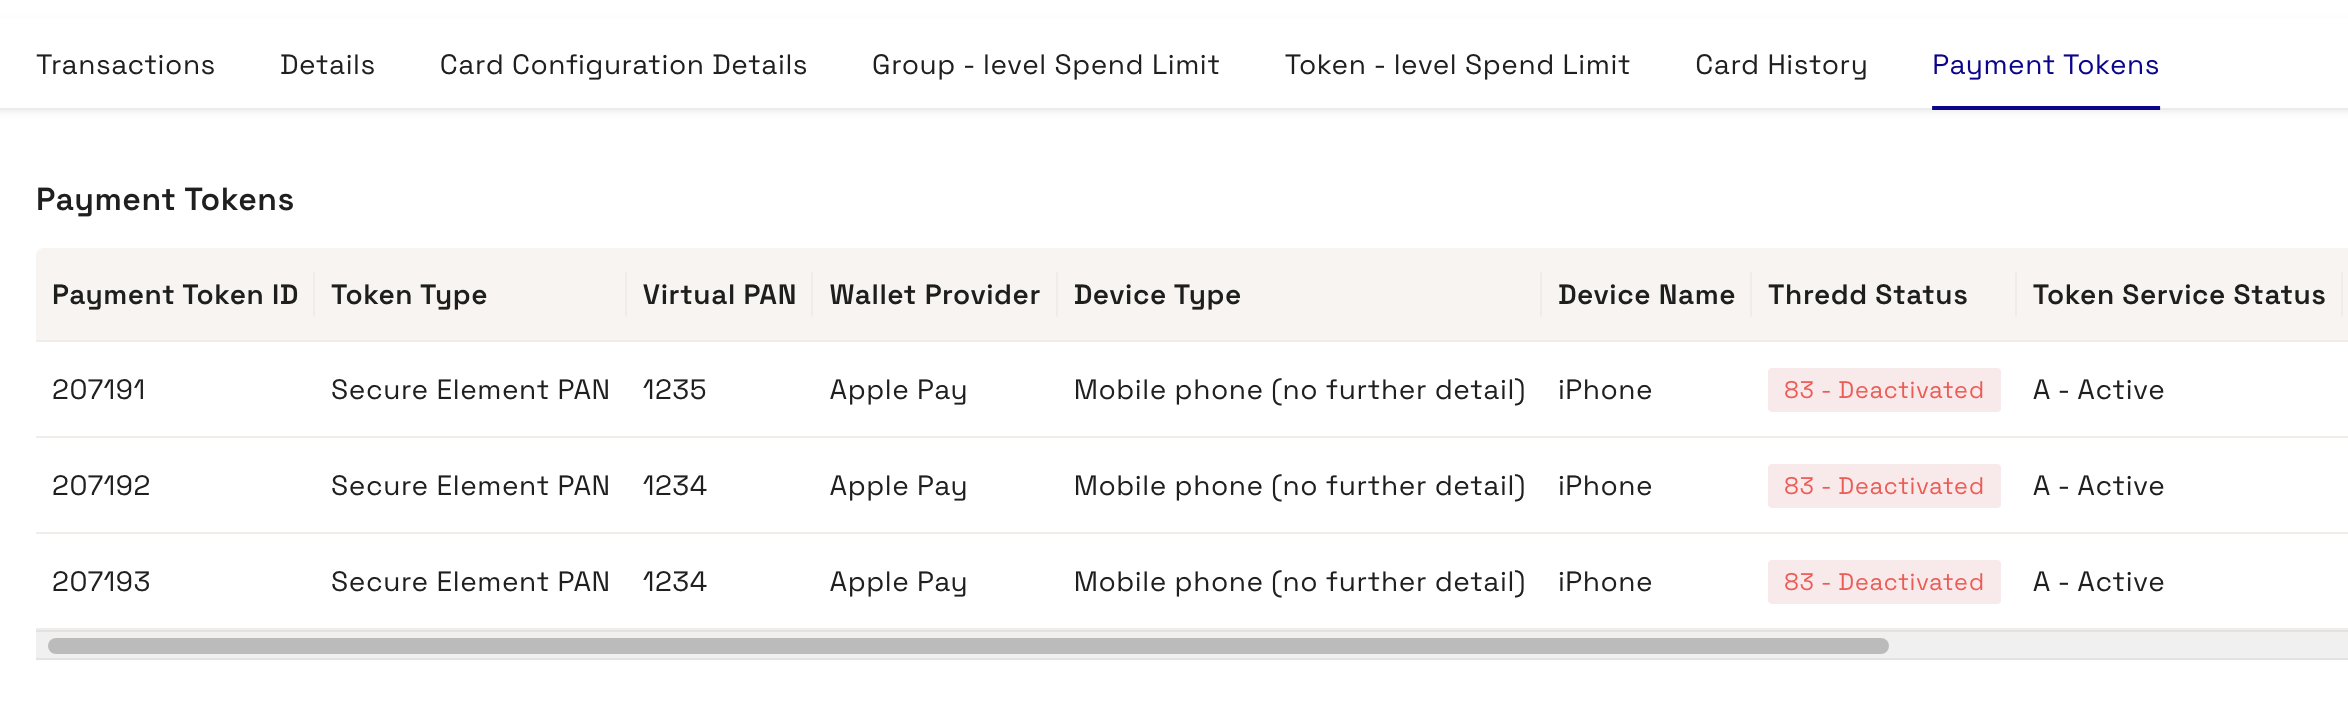
You can view multiple tokens linked to a card.
- From the Home page, if you know the token number, click Token ID and enter it. Then Click Search.
- To perform an advanced card holder search, from the Home page:
- Click Advanced Search.
- Enter the First Name and Last Name of the cardholder with any of the following details:
- Phone
- Date of Birth
- Address Line 1
- Postcode
- Card Status
- Product Name
- Click Search The search results display.
-
From the list of matching cards, click the required card to display the summary of card information.
-
Click the Payment Tokens tab. Details of payment tokens appear.
- From the Home page, if you know the token number, click Token ID and enter it. Then Click Search.
- To perform an advanced card holder search, from the Home page:
- Click Advanced Search.
- Enter the First Name and Last Name of the cardholder with any of the following details:
- Phone
- Date of Birth
- Address Line 1
- Postcode
- Card Status
- Product Name
- Click Search The search results display.
-
From the list of matching cards, click the required card to display the summary of card information.
-
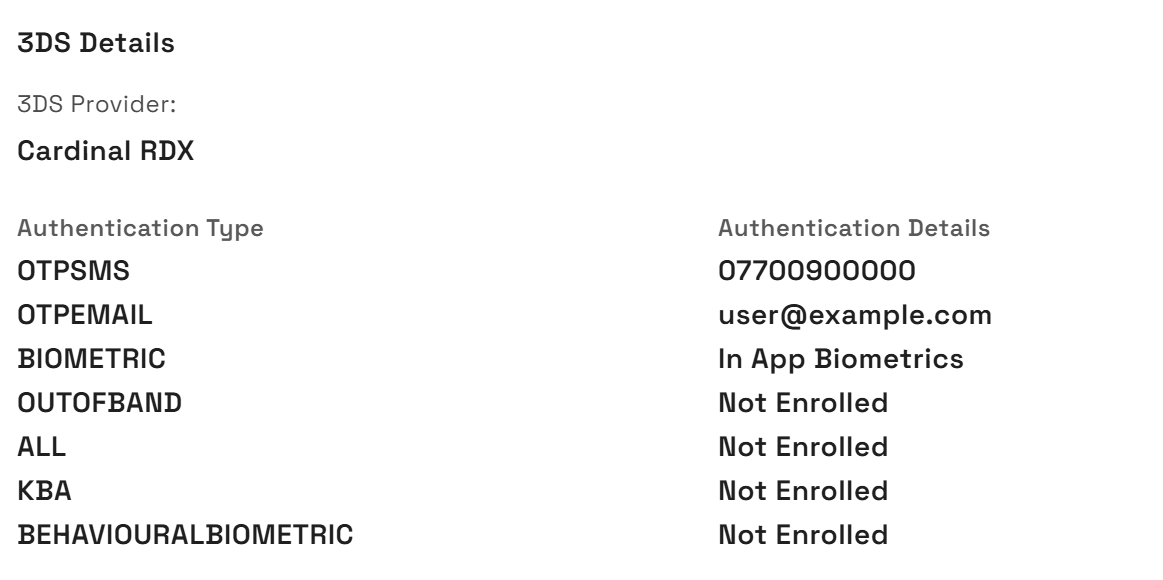
Click the Details tab.
- Scroll down to the 3DS Details section. The section shows information on the 3DS Provider, as well as the enrolled and unenrolled authentication types of the cardholder.
You can view details on the token, such as when it expires.
- From the Home page, if you know the token number, click Token ID and enter it. Then Click Search.
- To perform an advanced card holder search, from the Home page:
- Click Advanced Search.
- Enter the First Name and Last Name of the cardholder with any of the following details:
- Phone
- Date of Birth
- Address Line 1
- Postcode
- Card Status
- Product Name
- Click Search The search results display.
-
From the list of matching cards, click the required card to display the summary of card information.
-
Click the Payment Tokens tab. Details of payment tokens appear.
You can view details on the transaction that was captured at the terminal, such as the cardholder present/not present status.
- From the Home page, if you know the token number, click Token ID and enter it. Then Click Search.
- To perform an advanced card holder search, from the Home page:
- Click Advanced Search.
- Enter the First Name and Last Name of the cardholder with any of the following details:
- Phone
- Date of Birth
- Address Line 1
- Postcode
- Card Status
- Product Name
- Click Search The search results display.
-
From the list of matching cards, click the required card to display the summary of card information.
-
Click on the Transactions tab. Details of payment tokens appear.
-
Click on a transactions entry.
-
Click on the Merchant & Other Details tab.
-
Click Click to Reveal under Thredd POS Data.
- From the Home page, if you know the token number, click Token ID and enter it. Then Click Search.
- To perform an advanced card holder search, from the Home page:
- Click Advanced Search.
- Enter the First Name and Last Name of the cardholder with any of the following details:
- Phone
- Date of Birth
- Address Line 1
- Postcode
- Card Status
- Product Name
- Click Search The search results display.
-
From the list of matching cards, click the required card to display the summary of card information.
-
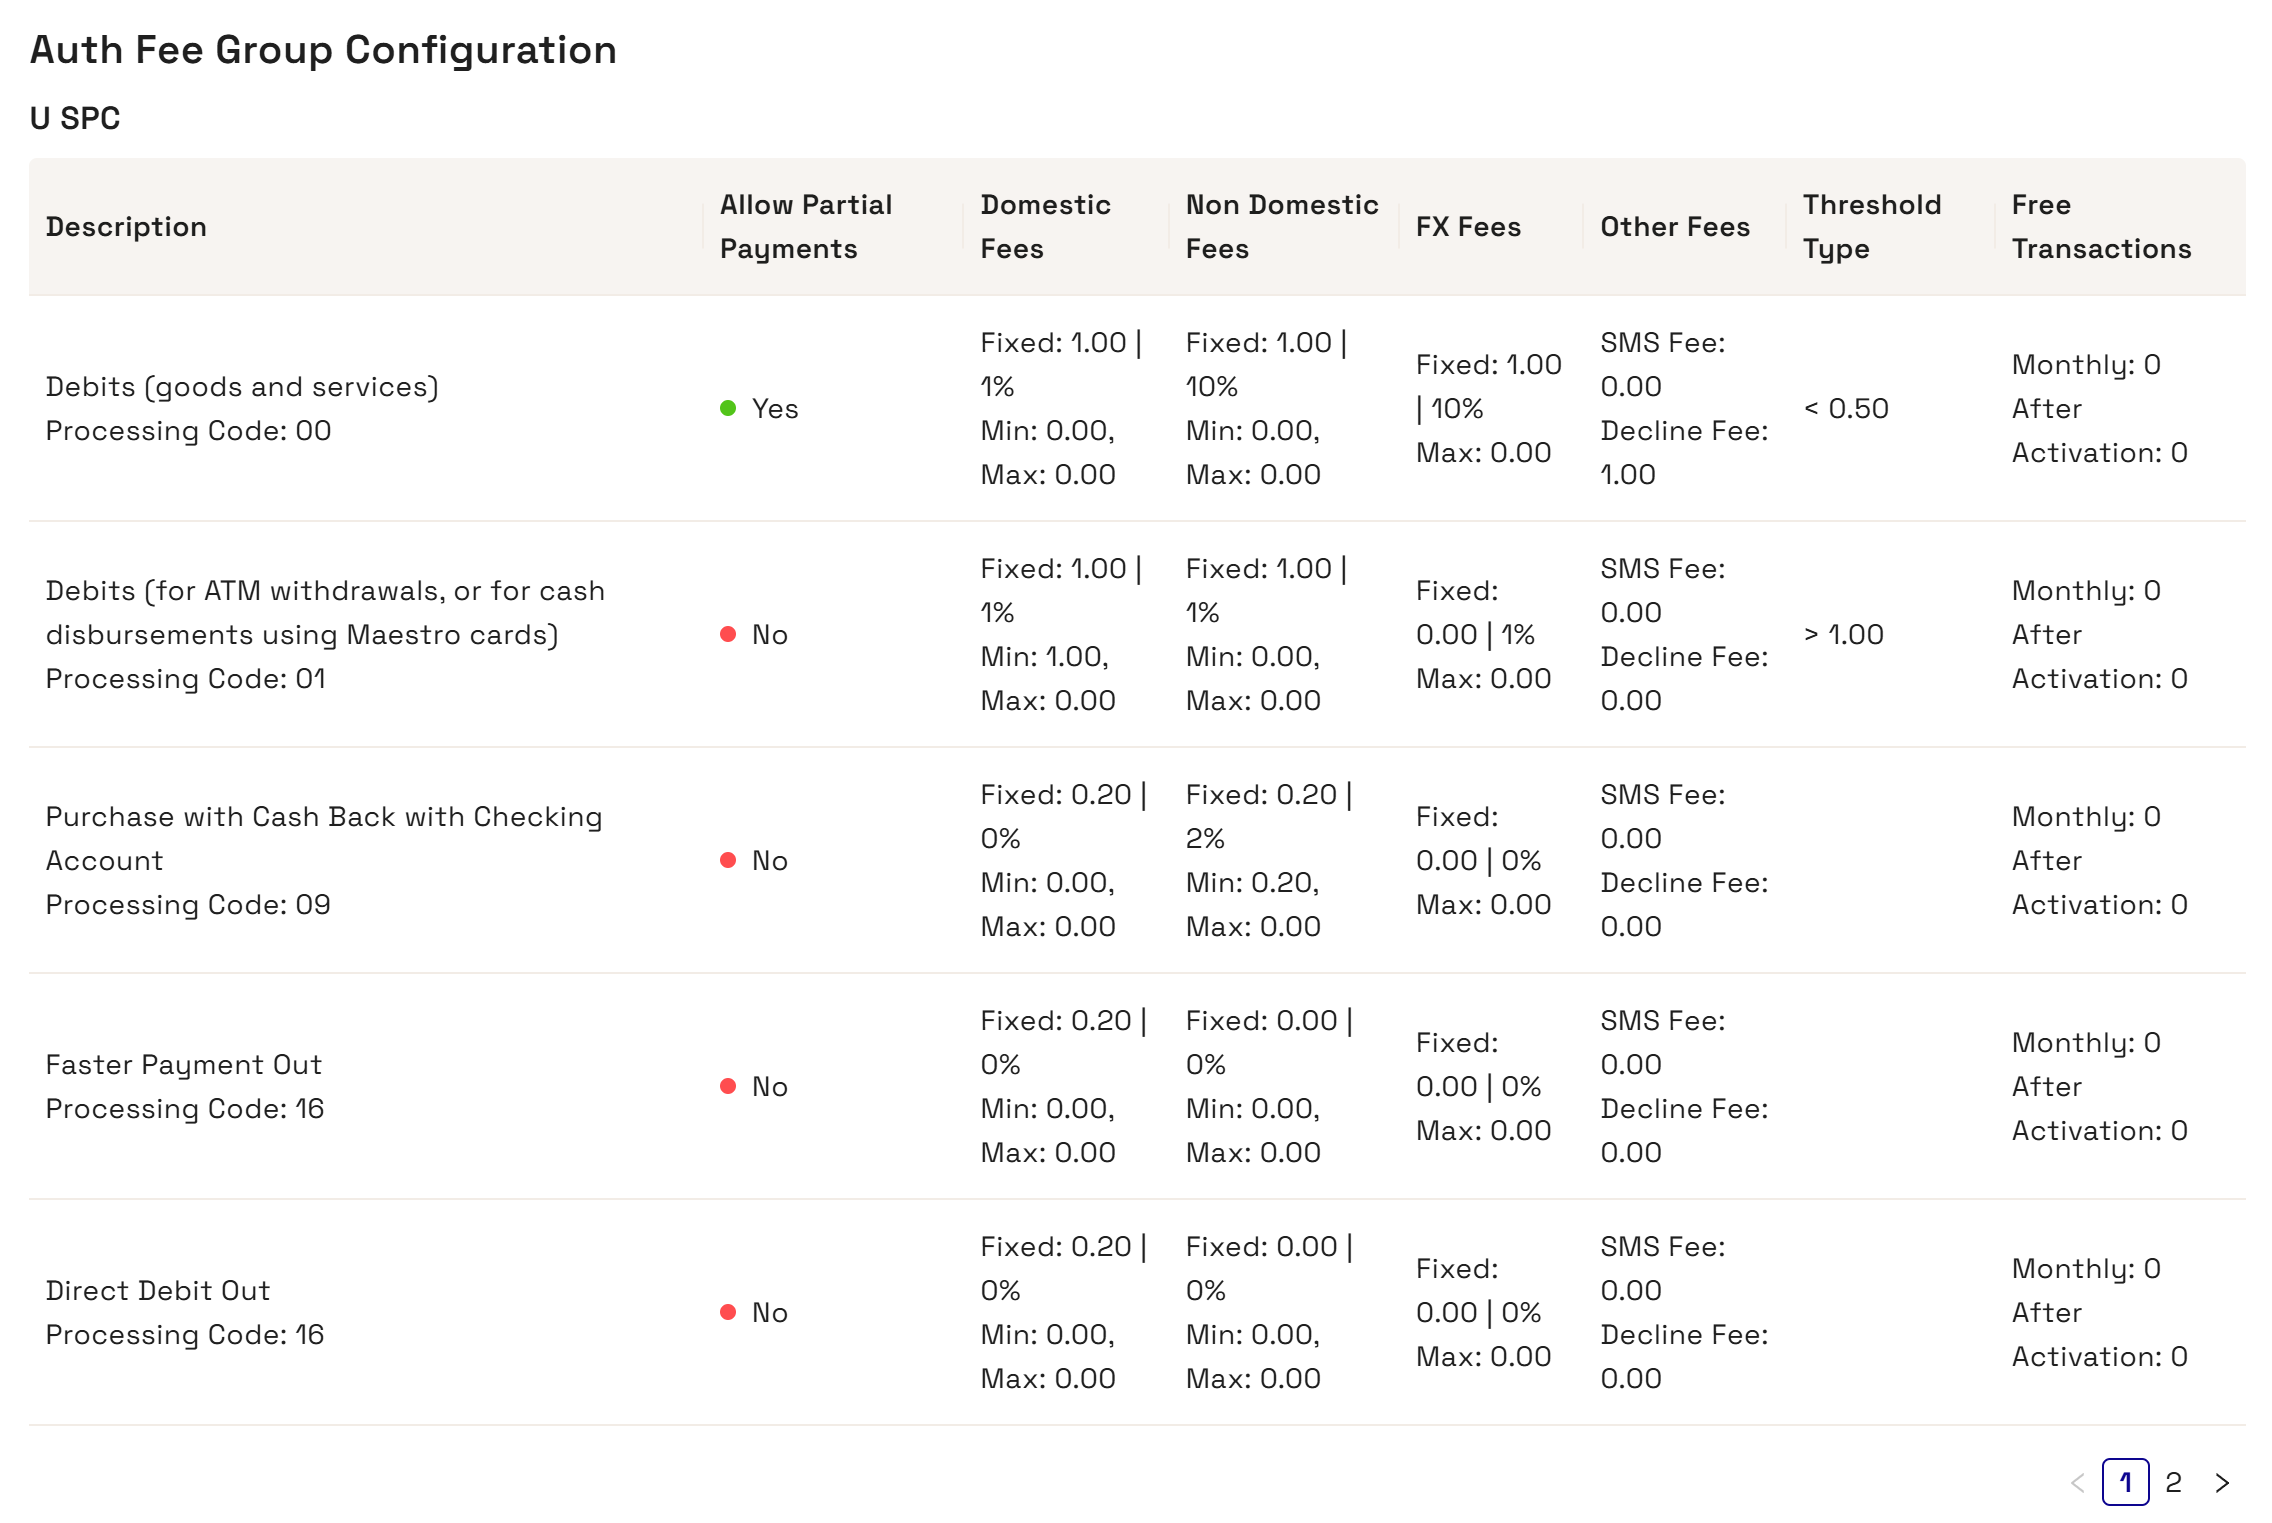
Click on the Card Configuration Details tab.
-
Scroll down to the Fees & Amount Configuration section.
-
Click View Configuration.
The screen appears similar to the following:
Card Actions and Configurations
This section includes details on various actions and configurations that you can perform on cards.
If a cardholder loses their card, you can change its status to lost until they receive a new replacement card. The status of the card must be Active before it is marked as Lost.
- From the Home page, if you know the token number, click Token ID and enter it. Then Click Search.
- To perform an advanced card holder search, from the Home page:
- Click Advanced Search.
- Enter the First Name and Last Name of the cardholder with any of the following details:
- Phone
- Date of Birth
- Address Line 1
- Postcode
- Card Status
- Product Name
- Click Search The search results display.
-
From the list of matching cards, click the required card to display the summary of card information.
-
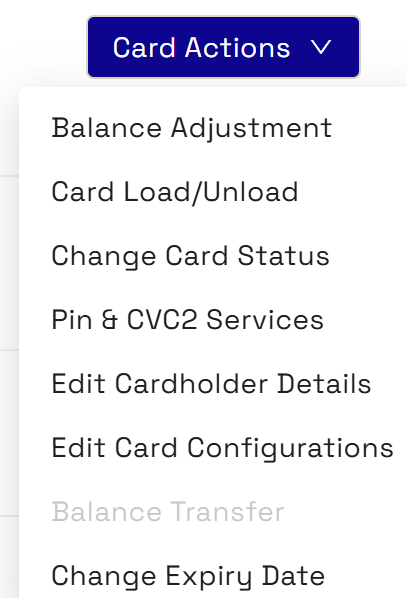
Go to Card Actions > Change Card Status.
-
In the displayed window, select 42 - Lost Card in the Change Card Status To list.
-
Select the following item from the drop-down list: 41 - Lost Card
-
Click Next on the displayed page that shows the status the card will change to.
-
Enter some notes on the change and click Save.
You can activate a card that is currently in the inactive state.
- From the Home page, if you know the token number, click Token ID and enter it. Then Click Search.
- To perform an advanced card holder search, from the Home page:
- Click Advanced Search.
- Enter the First Name and Last Name of the cardholder with any of the following details:
- Phone
- Date of Birth
- Address Line 1
- Postcode
- Card Status
- Product Name
- Click Search The search results display.
-
From the list of matching cards, click the required card to display the summary of card information.
-
Go to Card Actions > Change Card Status.
-
In the displayed window, set Allgood - 00 in the Change Card Status To list.
-
Click Next on the displayed page that shows the status the card will change to.
-
Enter some notes on the change and click Save.
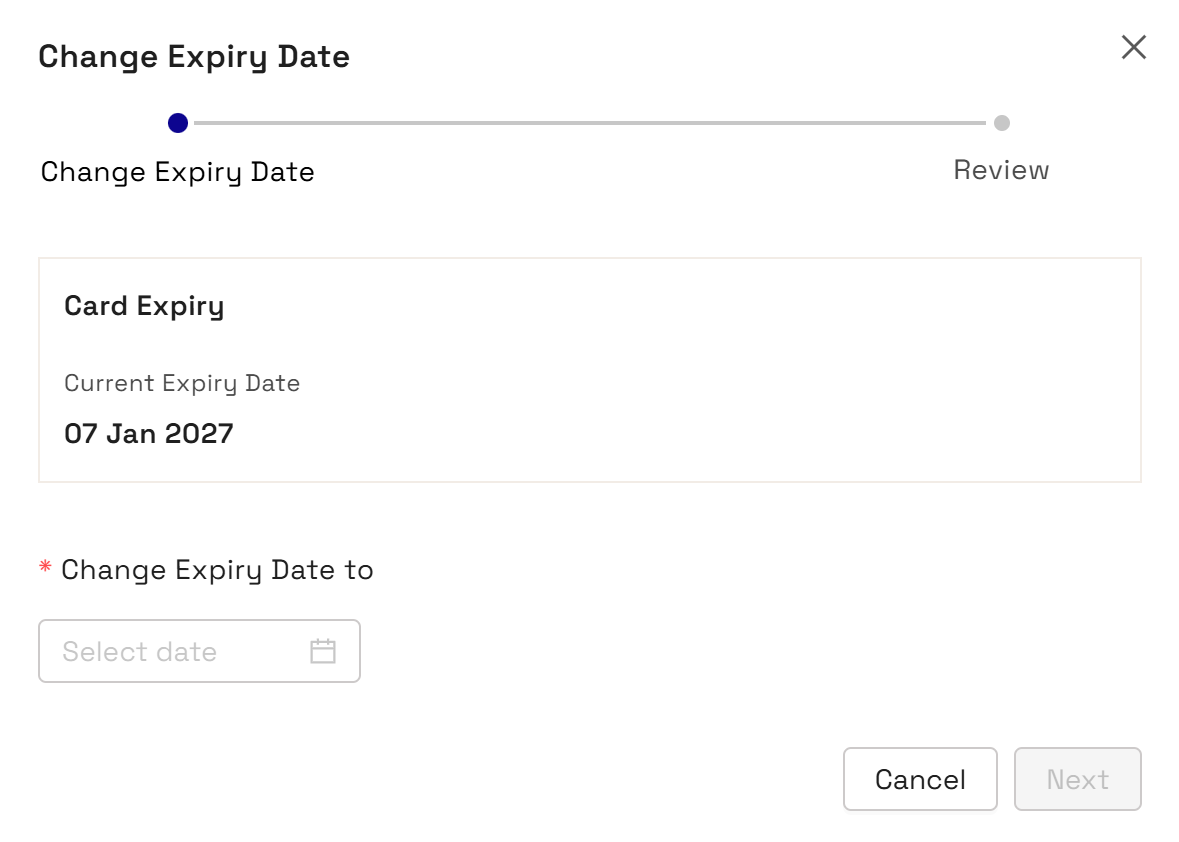
You can change the current expiry date for an active card. Changing the expiry date applies to a physical card with an embossed date and a non-physical physical card. For a physical card, you can only extend the expiry date within the date embossed on the card. Setting a date outside the period requires you to renew the card. A non-physical card does not have the same restrictions on setting dates
- From the Home page, if you know the token number, click Token ID and enter it. Then Click Search.
- To perform an advanced card holder search, from the Home page:
- Click Advanced Search.
- Enter the First Name and Last Name of the cardholder with any of the following details:
- Phone
- Date of Birth
- Address Line 1
- Postcode
- Card Status
- Product Name
- Click Search The search results display.
-
From the list of matching cards, click the required card to display the summary of card information.
-
Go to Card Actions > Change Expiry Date. The Change Expiry Date window appears.
-
Select another expiry date from the date picker in the Change Expiry Date To menu.
-
Click Next.
-
Enter some notes and click Save.
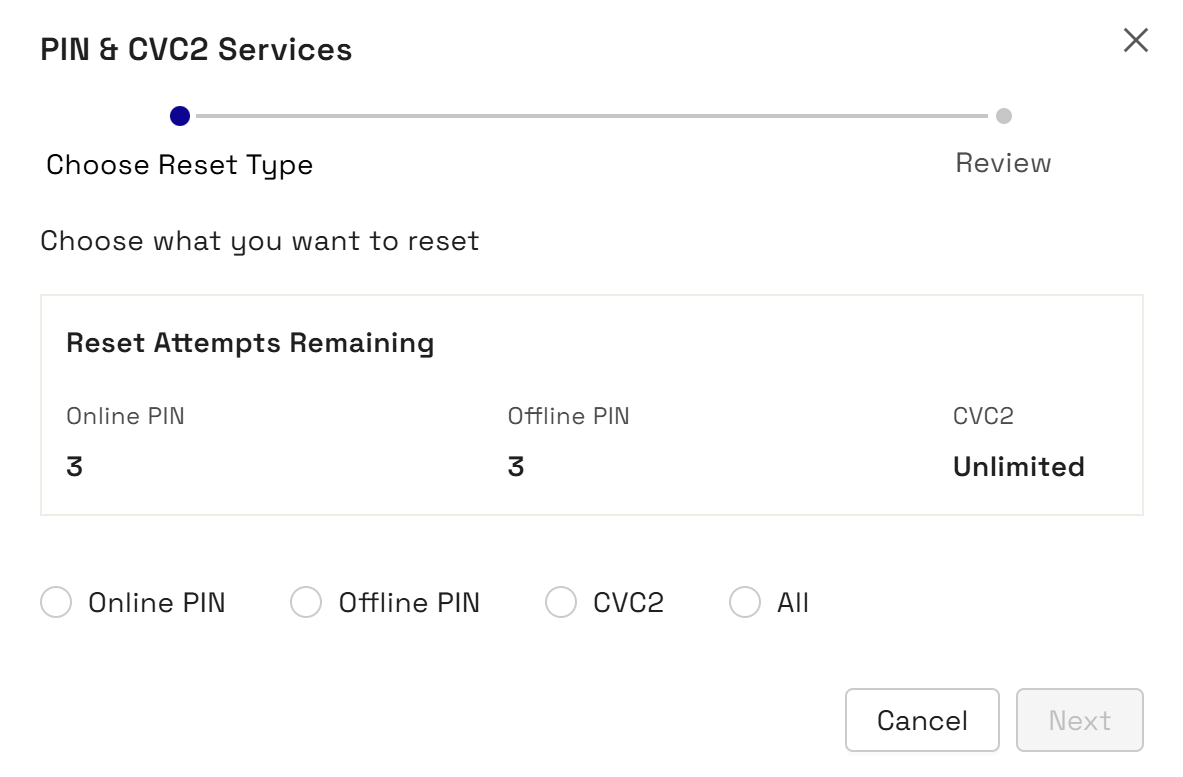
The number of permitted online and offline PIN retries are set to 5. CVC2 allows an unlimited number of retries. In some situations, these numbers may be different, and you can reset these for the cardholder. Note that a cardholder uses an Online PIN for online transactions, while they use an Offline PIN on a chip and PIN device.
- From the Home page, if you know the token number, click Token ID and enter it. Then Click Search.
- To perform an advanced card holder search, from the Home page:
- Click Advanced Search.
- Enter the First Name and Last Name of the cardholder with any of the following details:
- Phone
- Date of Birth
- Address Line 1
- Postcode
- Card Status
- Product Name
- Click Search The search results display.
-
From the list of matching cards, click the required card to display the summary of card information.
-
Go to Card Actions > Pin & CVC2 Services.
-
In the displayed window, review the Pin category that you want to reset and the number of attempts remaining.
-
Choose Online Pin, Offline PIN, CVC2, or All
-
Click Next to go to the Review & Save step.
-
When reviewed, click Save.
In some situations, you may need to block a card, for example, a KYC check highlighted certain issues behind the cardholder's activities.
- From the Home page, if you know the token number, click Token ID and enter it. Then Click Search.
- To perform an advanced card holder search, from the Home page:
- Click Advanced Search.
- Enter the First Name and Last Name of the cardholder with any of the following details:
- Phone
- Date of Birth
- Address Line 1
- Postcode
- Card Status
- Product Name
- Click Search The search results display.
-
From the list of matching cards, click the required card to display the summary of card information.
-
Go to Card Actions > Change Card Status.
-
In the displayed window, select any of the following reasons in the Change Card Status To list.
- 04 - Capture Card
- 05 - Do Not Honour
- 41 - Lost Card
- 46 - Closed Account
- 59 - Suspected Fraud
- 62 - Restricted Card
- 63 - Security Violation
- 70 - Cardholder to Contact Issuer
- 98 - Refund Given to Customer
- G1 - Short Term Debit Block
- G2 - Short Term Full Block
- G3 - Long Term Debit Block
- G4 - Long Term Full Block
- G5 - Gps Protect Short Term Debit Block
- G6 - Gps Protect Short Term Full Block
- G7 - Gps Protect Long Term Debit Block
- G8 - Gps Protect Long Term Full Block
- G9 - IVR -Lost Stolen Block
For more details on the settings, refer to Appendix B: Card Status Codes.
- Click Next.
-
Review the settings and enter a note to record the change.
-
Click Save.
The AllGood status is equivalent to Card Status 00.
A card can be blocked for the following reasons:
-
The fraud rules in Fraud Transaction Monitoring may deem a transaction on the card as suspicious.
-
The cardholder reported their card as lost or stolen.
-
The account for the card is closed or is in the process of closing.
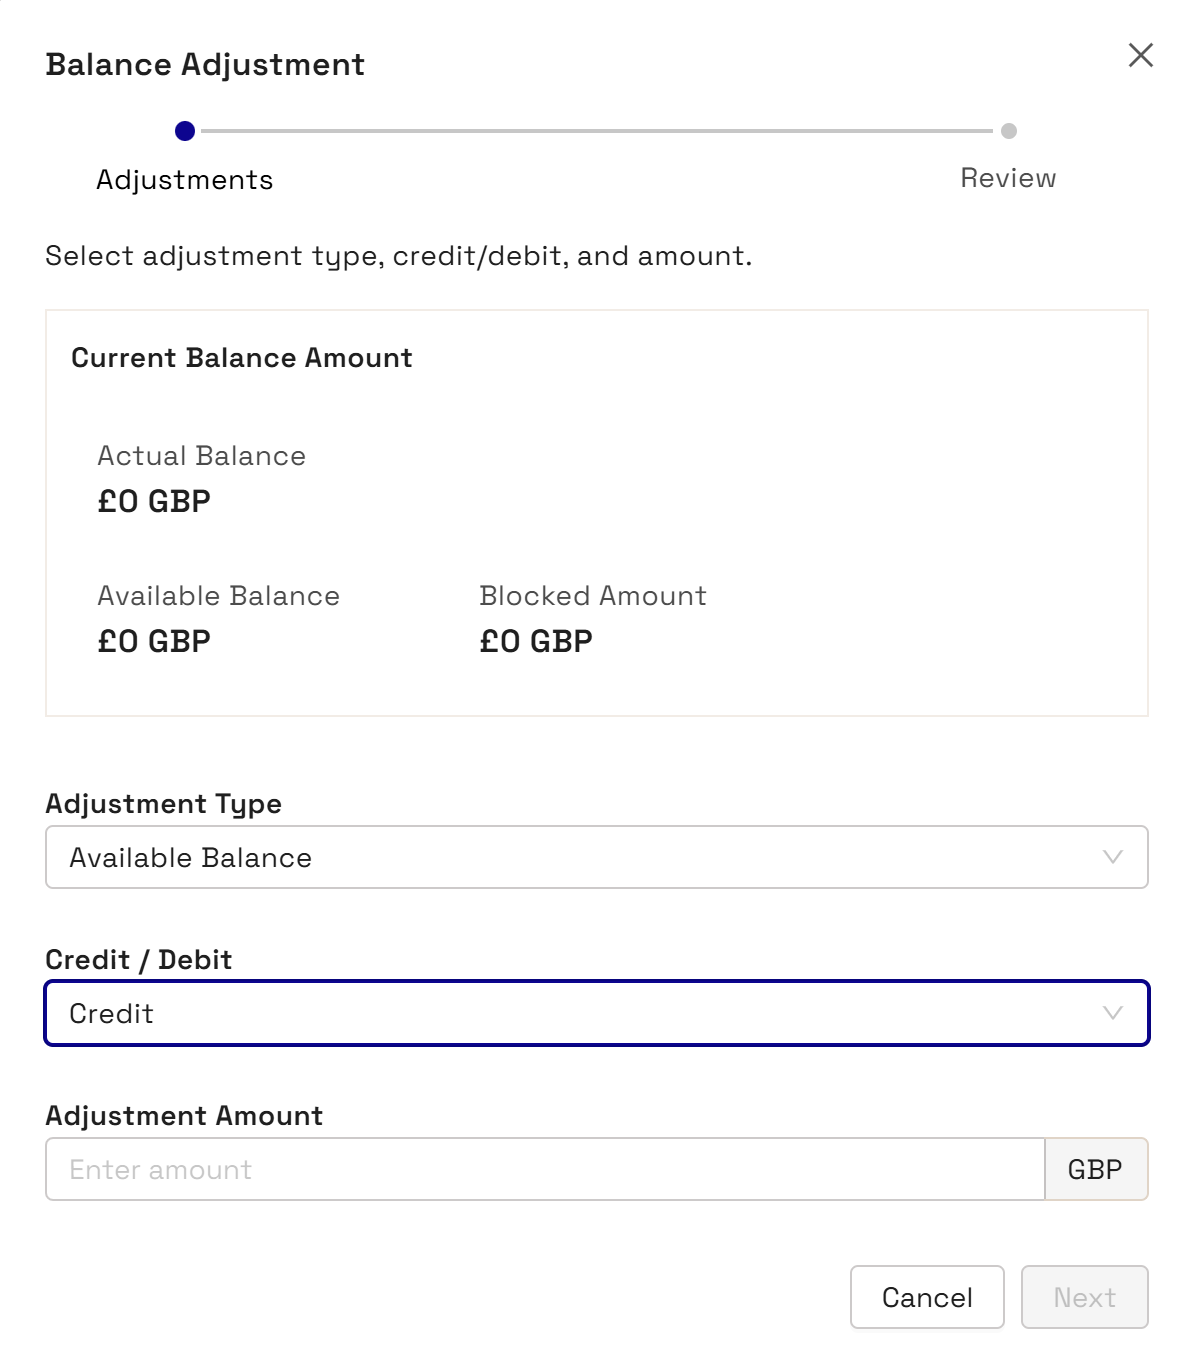
For refunding fees, you need to adjust the balance on the card. You can refund fees on an available amount or on a blocked amount.
- From the Home page, if you know the token number, click Token ID and enter it. Then Click Search.
- To perform an advanced card holder search, from the Home page:
- Click Advanced Search.
- Enter the First Name and Last Name of the cardholder with any of the following details:
- Phone
- Date of Birth
- Address Line 1
- Postcode
- Card Status
- Product Name
- Click Search The search results display.
-
From the list of matching cards, click the required card to display the summary of card information.
-
Go to Card Actions > Balance Adjustment.
-
Select Available Amount or Blocked Amount in the Adjustment Type menu as shown in the following example:
-
Type in a figure in the Adjustment Amount field.
-
Click Next and review the change.
-
Add a note for the change.
-
Click Save.
- From the Home page, if you know the token number, click Token ID and enter it. Then Click Search.
- To perform an advanced card holder search, from the Home page:
- Click Advanced Search.
- Enter the First Name and Last Name of the cardholder with any of the following details:
- Phone
- Date of Birth
- Address Line 1
- Postcode
- Card Status
- Product Name
- Click Search The search results display.
-
From the list of matching cards, click the required card to display the summary of card information.
-
Go to Card Actions > Card Load/Unload.
-
In the displayed window, select Load or Unload in the Cad Load/Unload list.
-
Click Next.
-
Enter a figure in the Adjustment Amount.
-
Click Next and review the amount.
-
Add a note to record the change and click Save.
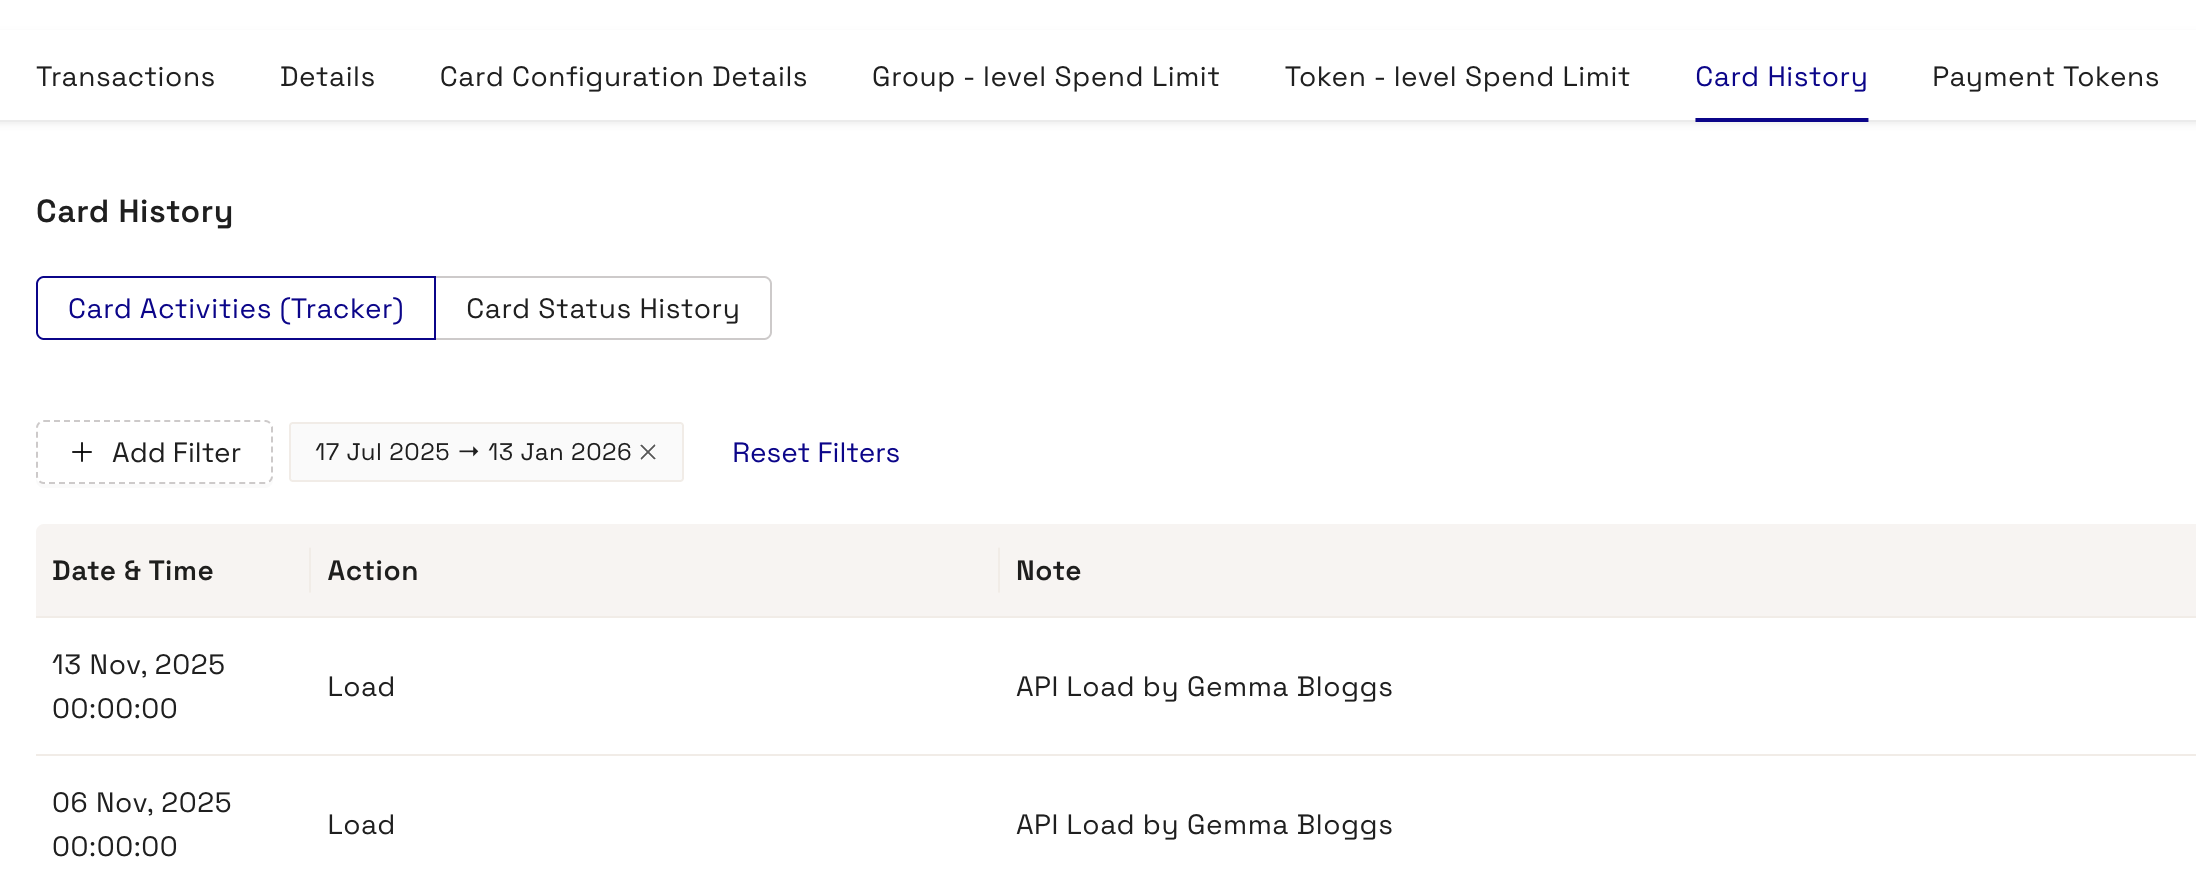
The card history provides details of activities performed on the card in Thredd Portal, changes made through the Thredd API, and the card status history. You can perform he below steps:
- From the Home page, if you know the token number, click Token ID and enter it. Then Click Search.
- To perform an advanced card holder search, from the Home page:
- Click Advanced Search.
- Enter the First Name and Last Name of the cardholder with any of the following details:
- Phone
- Date of Birth
- Address Line 1
- Postcode
- Card Status
- Product Name
- Click Search
-
From the list of matching cards, click the required card to display the summary of card information.
-
Click the Card History tab. Details of the card history appear.
-
Click Card Status History to view a history of the card statuses.
-
To view details of card activity, select a date range in the From Date and To Date fields and click Filter. The following shows an example:
-
To filter by date range for card activities or card status,
-
Click + Add Filter and Date Range.
-
Use the date picket to select a date range.
You can change the card disallow list through performing the below steps. However, before changing the card disallow list, Thredd must have already created the target list that you want to add. For setting up card disallow lists, contact Thredd's implementation team.
- From the Home page, if you know the token number, click Token ID and enter it. Then Click Search.
- To perform an advanced card holder search, from the Home page:
- Click Advanced Search.
- Enter the First Name and Last Name of the cardholder with any of the following details:
- Phone
- Date of Birth
- Address Line 1
- Postcode
- Card Status
- Product Name
- Click Search The search results display.
-
From the list of matching cards, click the required card to display the summary of card information.
-
Click the Card Configuration Details tab.
-
Click Edit Card Configurations.
-
Select an entry in the Group Usage and the Group Limit lists. This is mandatory.
-
Under the Edit Card Configurations screen for the token, select an item in the Card Disallow List menu.
-
Review the change, and enter text in the Notes field if required.
-
Click Save.
You can see all the Group Usage settings that have been configured for a card, categorised in to card group usage Rules, Card Acceptance Method, Transaction Type, Verification Checks, and Miscellaneous.
- From the Home page, if you know the token number, click Token ID and enter it. Then Click Search.
- To perform an advanced card holder search, from the Home page:
- Click Advanced Search.
- Enter the First Name and Last Name of the cardholder with any of the following details:
- Phone
- Date of Birth
- Address Line 1
- Postcode
- Card Status
- Product Name
- Click Search The search results display.
-
From the list of matching cards, click the required card to display the summary of card information.
-
Click the Card Configuration Details tab.
-
Click the name of the user group in the Group Usage item.
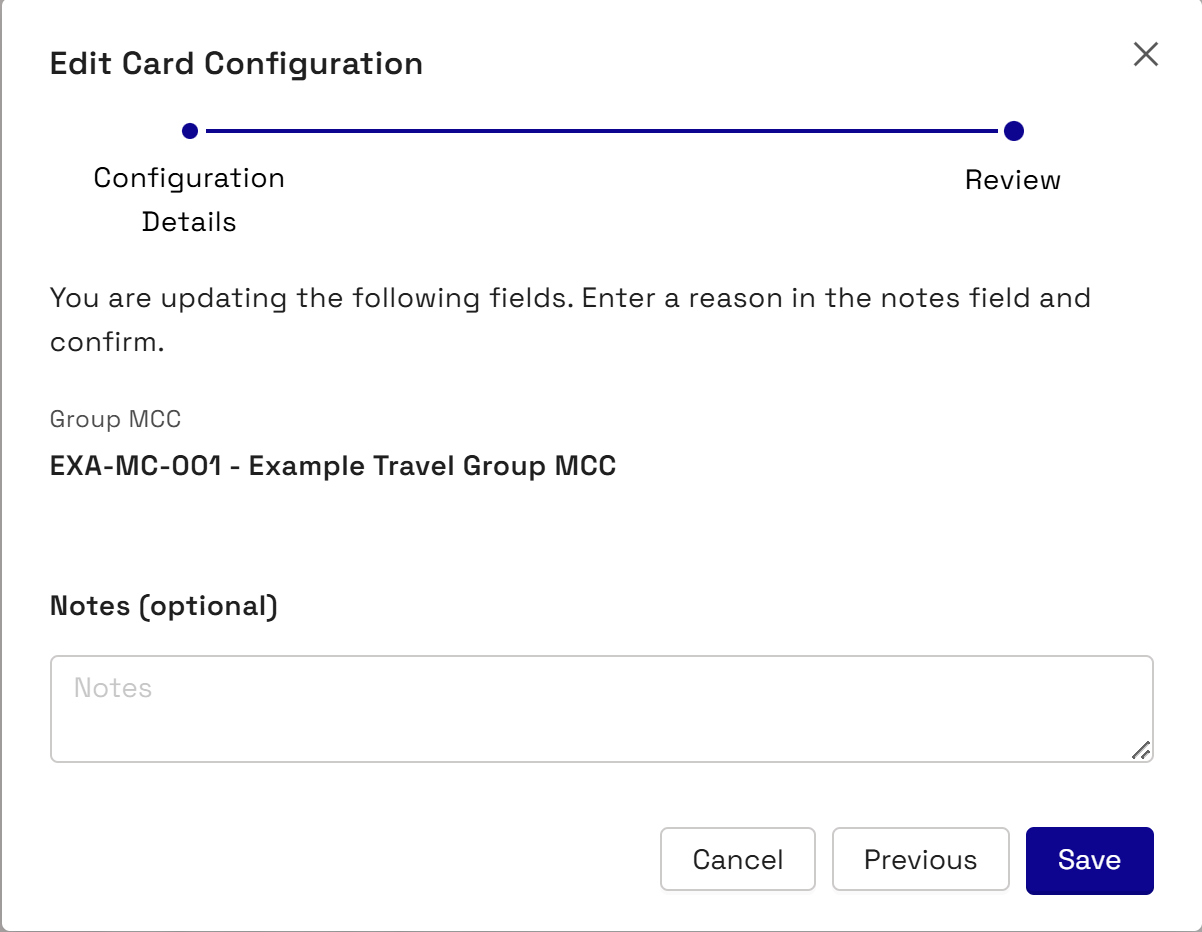
You can update the Group MCC which allows or disallows card acceptance (auths) based on one or more merchant category codes (MCC).
Note that changing a group requires Thredd to have first set up the group with the relevant categories.
- From the Home page, if you know the token number, click Token ID and enter it. Then Click Search.
- To perform an advanced card holder search, from the Home page:
- Click Advanced Search.
- Enter the First Name and Last Name of the cardholder with any of the following details:
- Phone
- Date of Birth
- Address Line 1
- Postcode
- Card Status
- Product Name
- Click Search The search results display.
-
From the list of matching cards, click the required card to display the summary of card information.
-
Go to Card Actions > Edit Card Configurations.
-
Select an entry in the Group Usage and the Group Limit lists. This is mandatory.
-
Select a group in the Group MCC list. The Edit Card Configuration window appears.
-
Review the change, and enter text in the Notes field if required.
-
Click Save.
You can change the limit held on the card. For example, you can alter the maximum balance that the card allows.
Note that changing a group requires Thredd to have first set up the relevant groups and the individual limits.
- From the Home page, if you know the token number, click Token ID and enter it. Then Click Search.
- To perform an advanced card holder search, from the Home page:
- Click Advanced Search.
- Enter the First Name and Last Name of the cardholder with any of the following details:
- Phone
- Date of Birth
- Address Line 1
- Postcode
- Card Status
- Product Name
- Click Search The search results display.
-
From the list of matching cards, click the required card to display the summary of card information.
-
Go to Card Actions > Edit Card Configurations.
-
Under the Edit Card Configurations screen for the token, select another group in Group Limit.
-
Review the change, and enter text in the Notes field if required.
-
Click Save.
You can change the usage group on a card to another one that is available. For example, a region may have a specific PAN entry method that is listed in a different usage group.
Note that changing a card group requires Thredd to have first set up the group, and the individual settings.
- From the Home page, if you know the token number, click Token ID and enter it. Then Click Search.
- To perform an advanced card holder search, from the Home page:
- Click Advanced Search.
- Enter the First Name and Last Name of the cardholder with any of the following details:
- Phone
- Date of Birth
- Address Line 1
- Postcode
- Card Status
- Product Name
- Click Search The search results display.
-
From the list of matching cards, click the required card to display the summary of card information.
-
Go to Card Actions > Edit Card Configurations.
-
Under the Edit Card Configurations screen for the token, select another entry in Group Usage.
-
To confirm the change, click Review and Save.
-
Check the updated details and click Save.
Changing the Card Usage group may require Issuer sign off.
- From the Home page, if you know the token number, click Token ID and enter it. Then Click Search.
- To perform an advanced card holder search, from the Home page:
- Click Advanced Search.
- Enter the First Name and Last Name of the cardholder with any of the following details:
- Phone
- Date of Birth
- Address Line 1
- Postcode
- Card Status
- Product Name
- Click Search The search results display.
-
From the list of matching cards, click the required card to display the summary of card information. A Multi-FX card shows the View Currency Wallets option. This option is only available for Multi-FX cards.
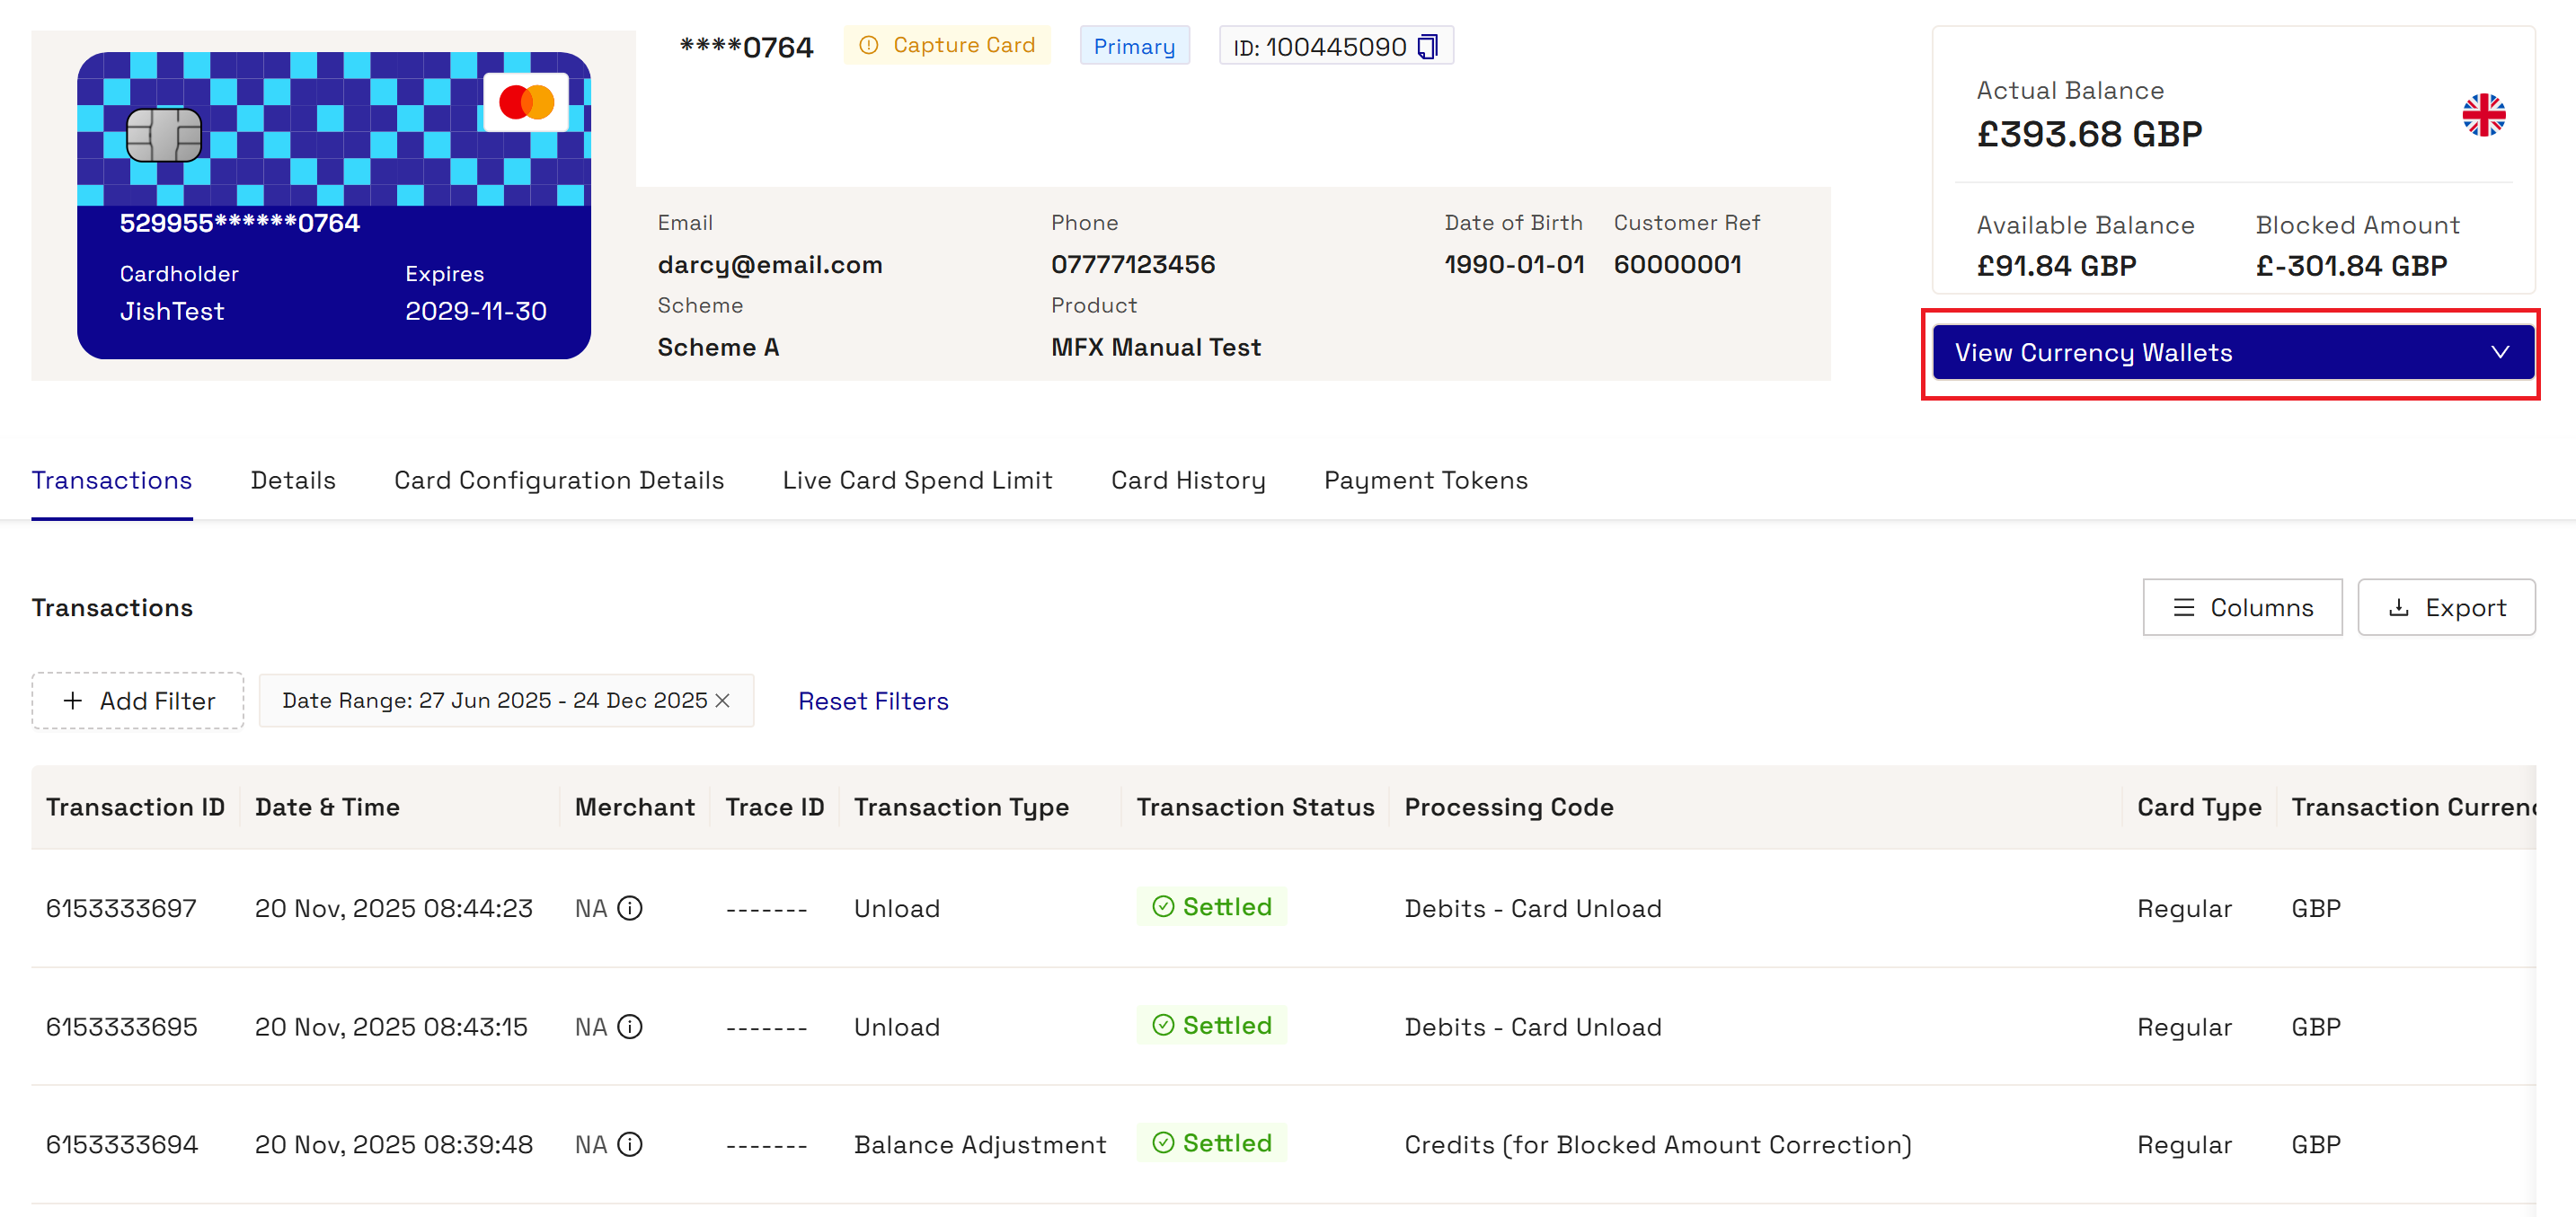
A Multi-FX wallet includes details of the total and available balance, blocked amount, and its associated currency. A Multi-FX card can have up to 5 wallets of a unique currency.
- From the Home page, if you know the token number, click Token ID and enter it. Then Click Search.
- To perform an advanced card holder search, from the Home page:
- Click Advanced Search.
- Enter the First Name and Last Name of the cardholder with any of the following details:
- Phone
- Date of Birth
- Address Line 1
- Postcode
- Card Status
- Product Name
- Click Search The search results display.
-
From the list of matching cards, click the required card to display the summary of card information. A Multi-FX card shows the View Currency Wallets option.
-
To view individual currency wallets, click View Currency Wallets and choose an individual currency for the wallet. Details of the Actual Balance, Available Balance, and Blocked Amount appear on the screen.
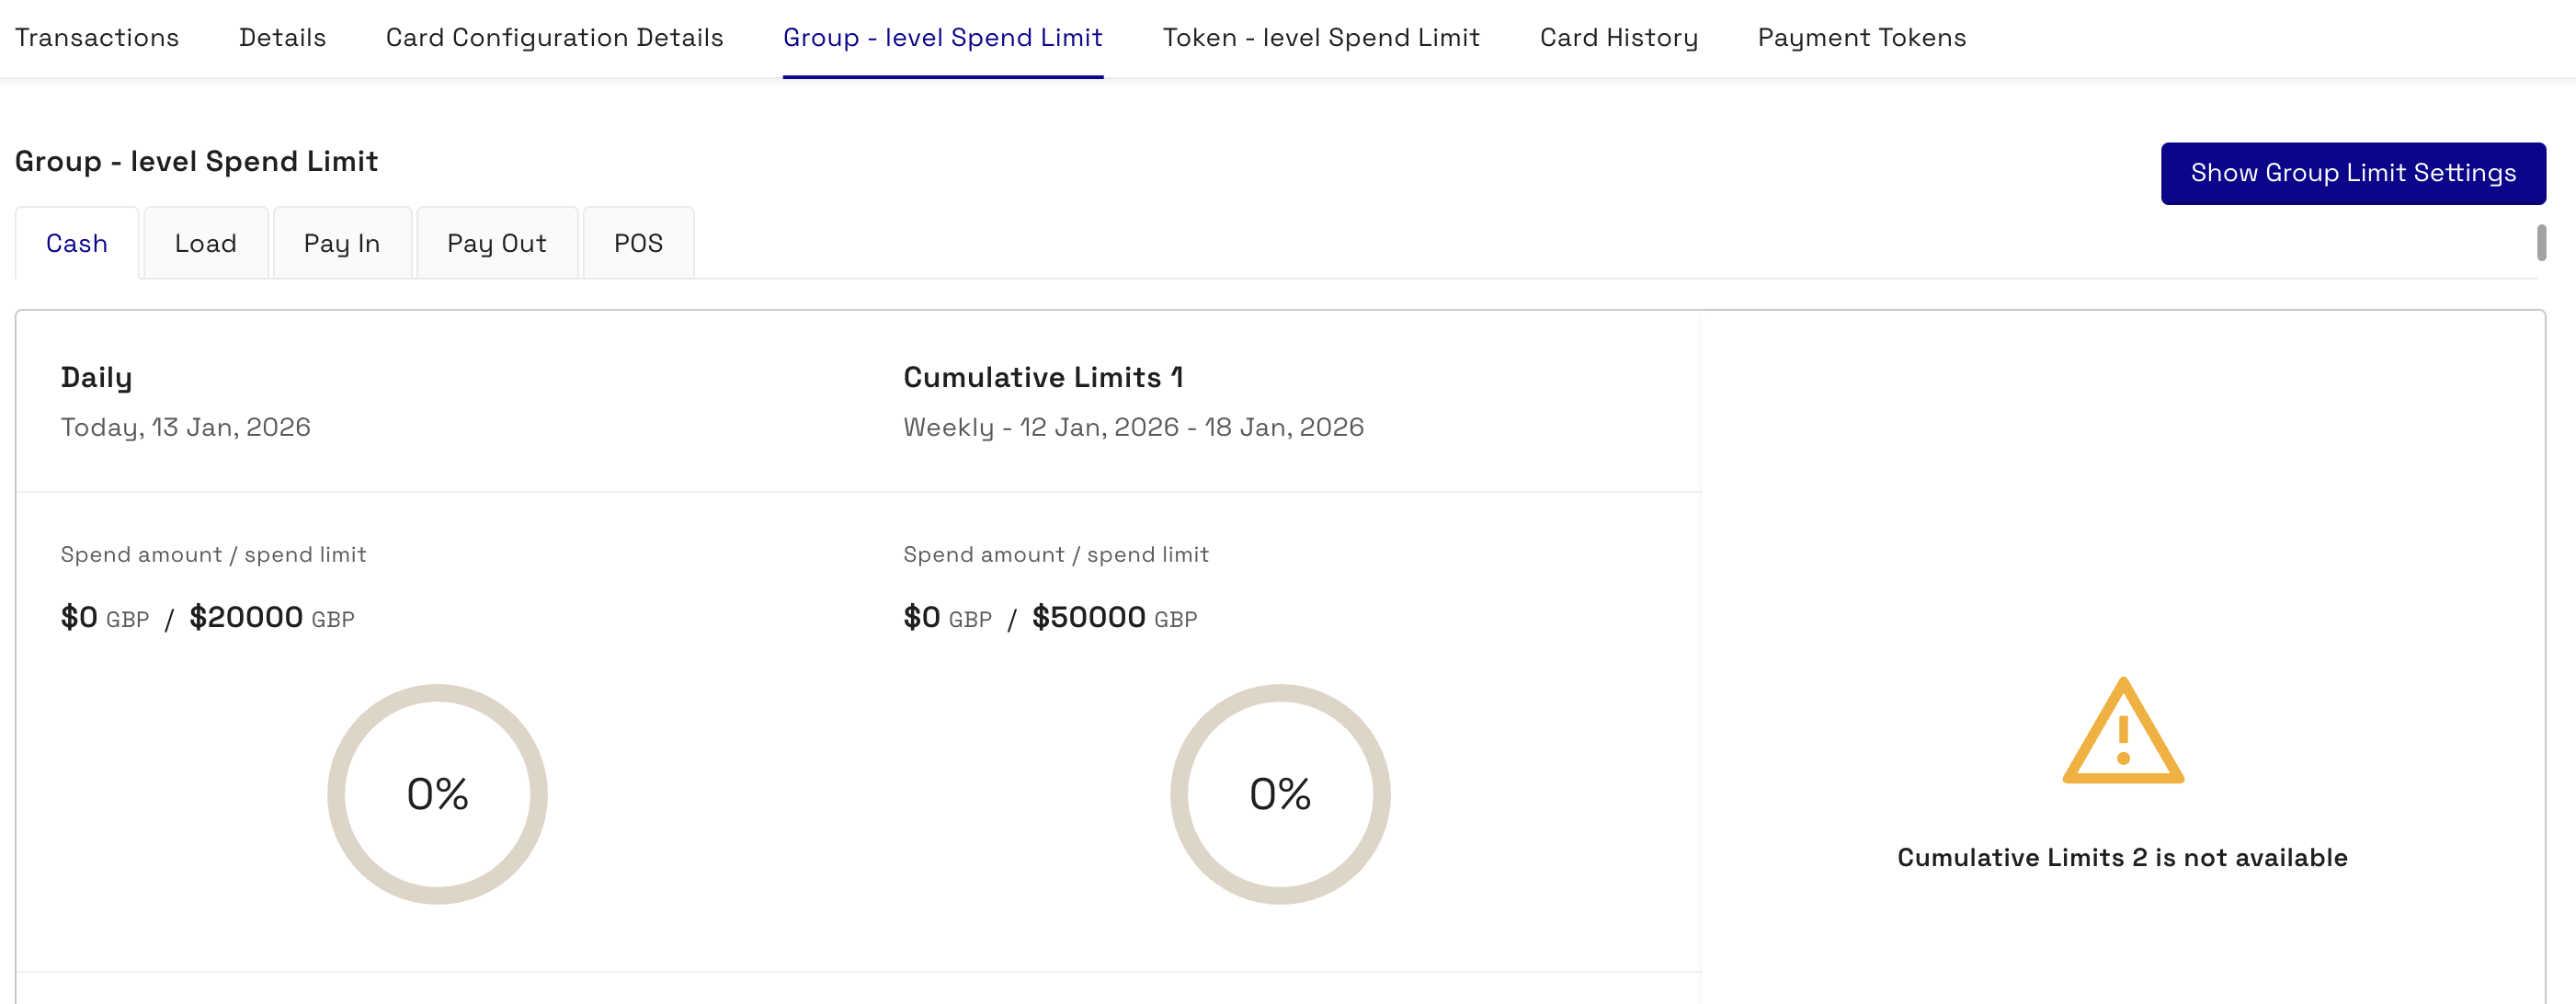
You can see the live spend limits on a card. This includes data on the spend amount as a proportion of the limit and the spend frequency. The limits exist in the following categories:
-
Cash transactions
-
Card loads
-
Amount paid in
-
Transactions made through POS
-
From the Home page, if you know the token number, click Token ID and enter it. Then Click Search.
- To perform an advanced card holder search, from the Home page:
- Click Advanced Search.
- Enter the First Name and Last Name of the cardholder with any of the following details:
- Phone
- Date of Birth
- Address Line 1
- Postcode
- Card Status
- Product Name
- Click Search The search results display.
-
From the list of matching cards, click the required card to display the summary of card information.
-
Click the tab for spend limits. The following shows the spend limit settings.
Viewing Transactions
Thredd Portal allows you to view details on recent transactions that have happened in one or more cards.
A transaction status indicates the current state of a transaction (for example an authorisation). You can view the transaction statuses to filter your card transactions. The statuses are as follows:
|
Status |
Description |
|---|---|
|
Accepted |
The authorised amount on a transaction is blocked, where the funds are reserved for the transaction and are no longer available for other uses. |
|
Cleared |
The issuer transfers the requested settlement amount on the transaction to the acquirer. This is in the form of clearing files containing presentments. |
|
Disputed |
The transaction is disputed, for example, the customer has raised a chargeback with the issuer. |
|
Processing external host |
EHI is processing the transaction, but has not yet responded to Thredd. |
|
Declined |
The transaction has been declined, for example, due to the amount of the authorisation exceeding the allowed limit. |
|
Rejected |
The transaction is rejected in certain rare scenarios. |
|
Processing |
The transaction is in processing, but where a final status is still pending. For example, the transaction is in the process of being added to the database. |
|
Removed |
The authorised amount on a transaction is unblocked in instances where the reversal on an authorisation has failed. |
|
Settled |
The transaction has been settled where the authorised and cleared funds have been transferred between the Issuer and the Acquirer. |
|
Reversed |
The authorisation on the transaction has been reversed, for example, when a customer cancelled payment. |
Thredd Portal: Cards and Transaction Management can display up to 10000 transaction results from a request, where the results are paginated.
- If you know the transaction number, click Transaction ID and enter it from the Home page and Click Search.
-
To perform an advanced transaction search from the Home page:
-
Click Advanced Search.
-
Click the Transactions tab.
-
Enter the details in any of the following fields:
-
Transaction ID
-
Token
-
Trace ID
-
Date
-
-
- To perform an advanced transaction search, click Advanced Transaction Search and enter any of the following details:
- Transaction Type
- Transaction Status
- Note
- Merchant Location
- Processing Code
- Billing Amount and Currency
- Transaction Amount and Currency
- Network Type
- Card Type
- Click Search. The results of the search display, with all transactions matching the criteria displayed below the Transaction Search options.
- Click on a transaction item.
- Click the Transaction Lifecycle tab and view details of the entry.
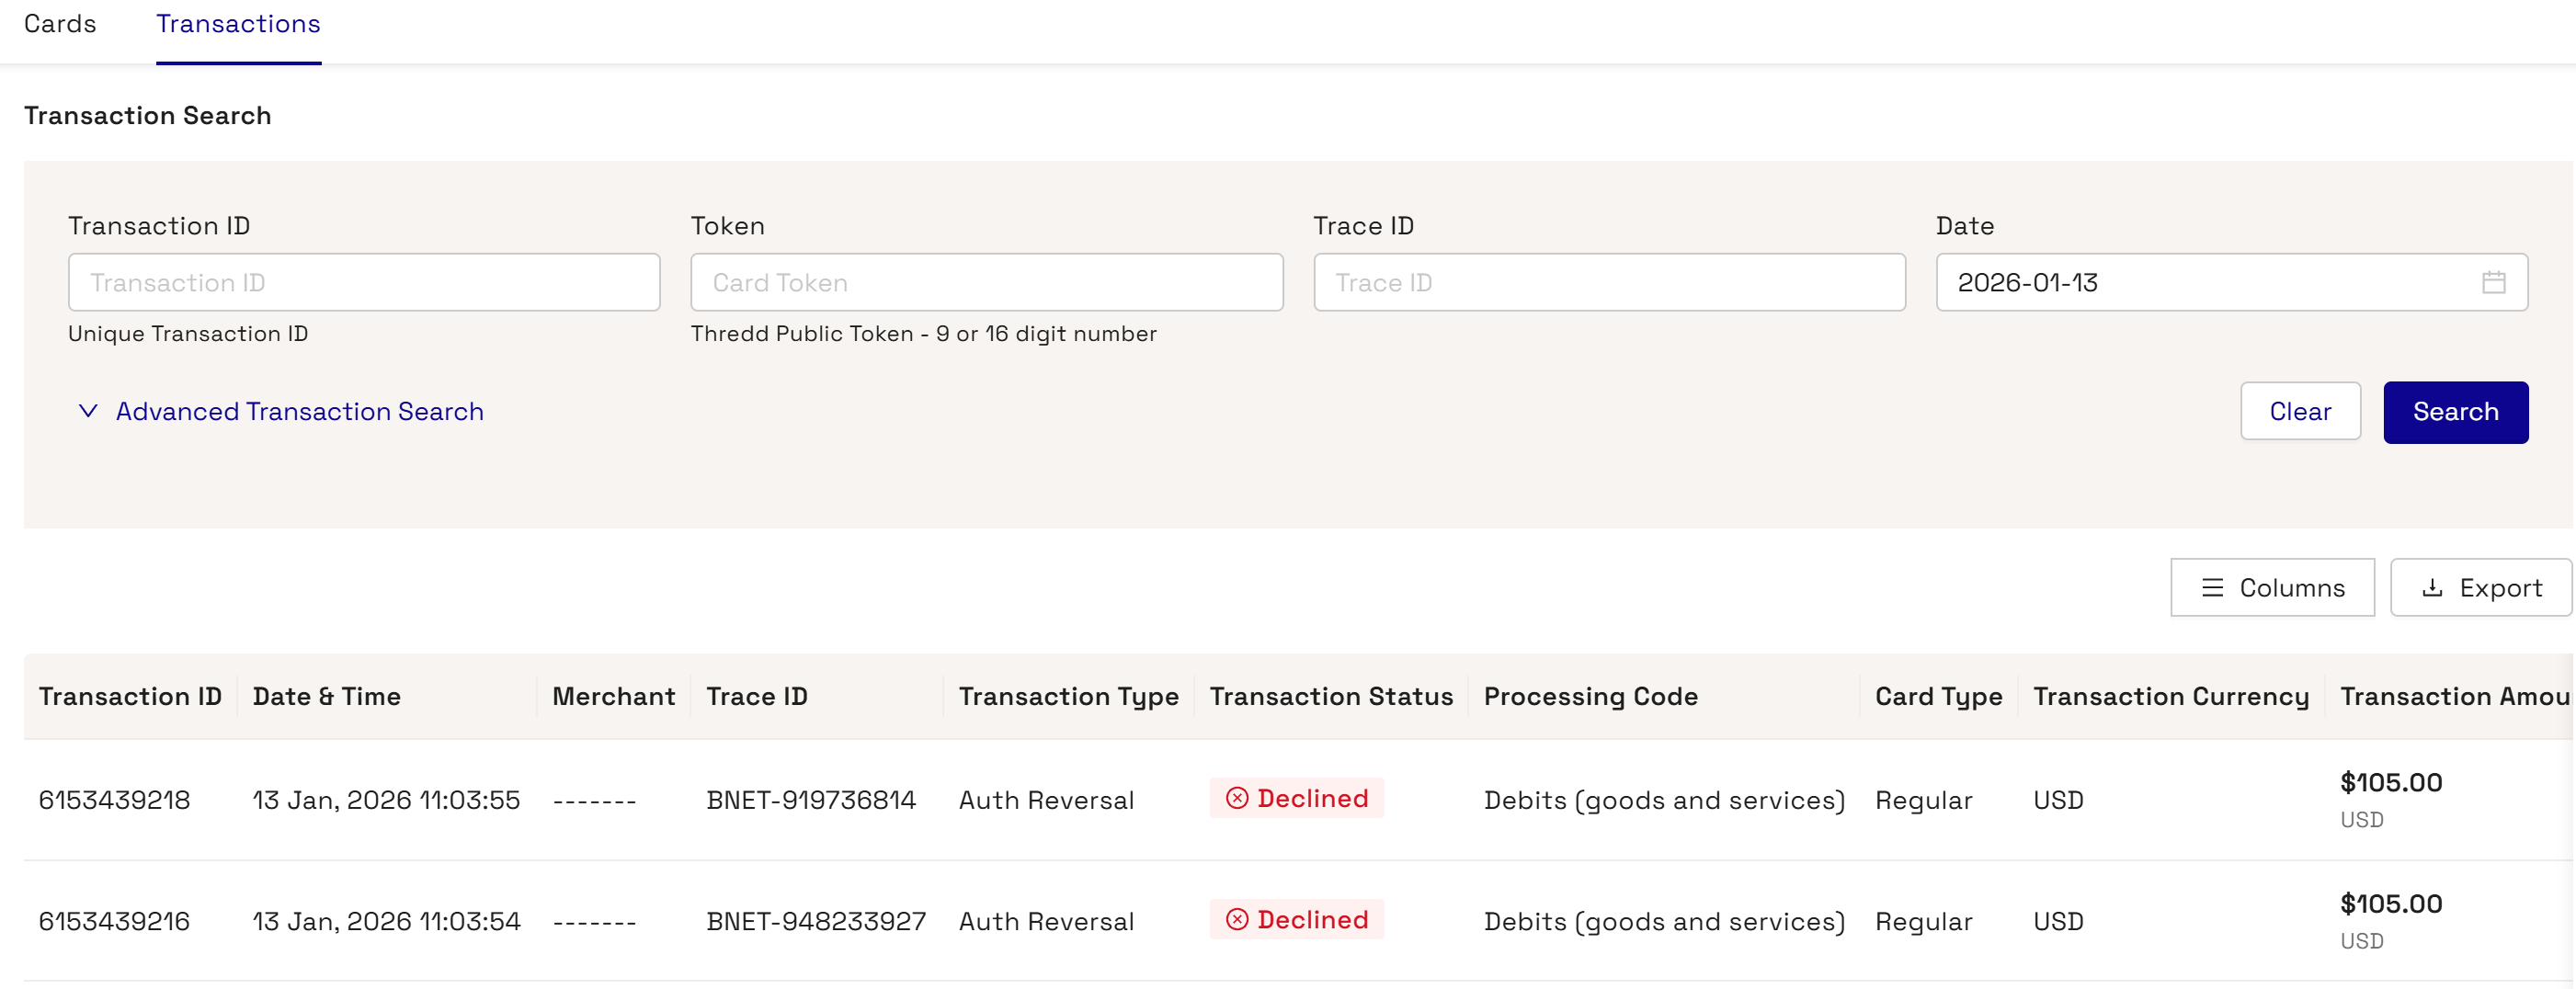
If Thredd has not received a presentment for an authorisation, which is normally within a 7-day period, the transaction expires. The period is usually longer (up to 30 days) for merchants using pre-authorisations, such as car hires and hotels. The acquirer sends a Reversal to Thredd. These are the steps you can follow to check for a reversal:
- If you know the transaction number, click Transaction ID and enter it from the Home page and Click Search.
-
To perform an advanced transaction search from the Home page:
-
Click Advanced Search.
-
Click the Transactions tab.
-
Enter the details in any of the following fields:
-
Transaction ID
-
Token
-
Trace ID
-
Date
-
-
- To perform an advanced transaction search, click Advanced Transaction Search and enter any of the following details:
- Transaction Type
- Transaction Status
- Note
- Merchant Location
- Processing Code
- Billing Amount and Currency
- Transaction Amount and Currency
- Network Type
- Card Type
- Click Search. The results of the search display, with all transactions matching the criteria displayed below the Transaction Search options.
- Click on a transaction item with a Transaction Type of Auth Reversal.

- If you know the transaction number, click Transaction ID and enter it from the Home page and Click Search.
-
To perform an advanced transaction search from the Home page:
-
Click Advanced Search.
-
Click the Transactions tab.
-
Enter the details in any of the following fields:
-
Transaction ID
-
Token
-
Trace ID
-
Date
-
-
- To perform an advanced transaction search, click Advanced Transaction Search and enter any of the following details:
- Transaction Type
- Transaction Status
- Note
- Merchant Location
- Processing Code
- Billing Amount and Currency
- Transaction Amount and Currency
- Network Type
- Card Type
- Click Search. The results of the search display, with all transactions matching the criteria displayed below the Transaction Search options.
- Click on a transaction item with a Transaction Type of Presentment.

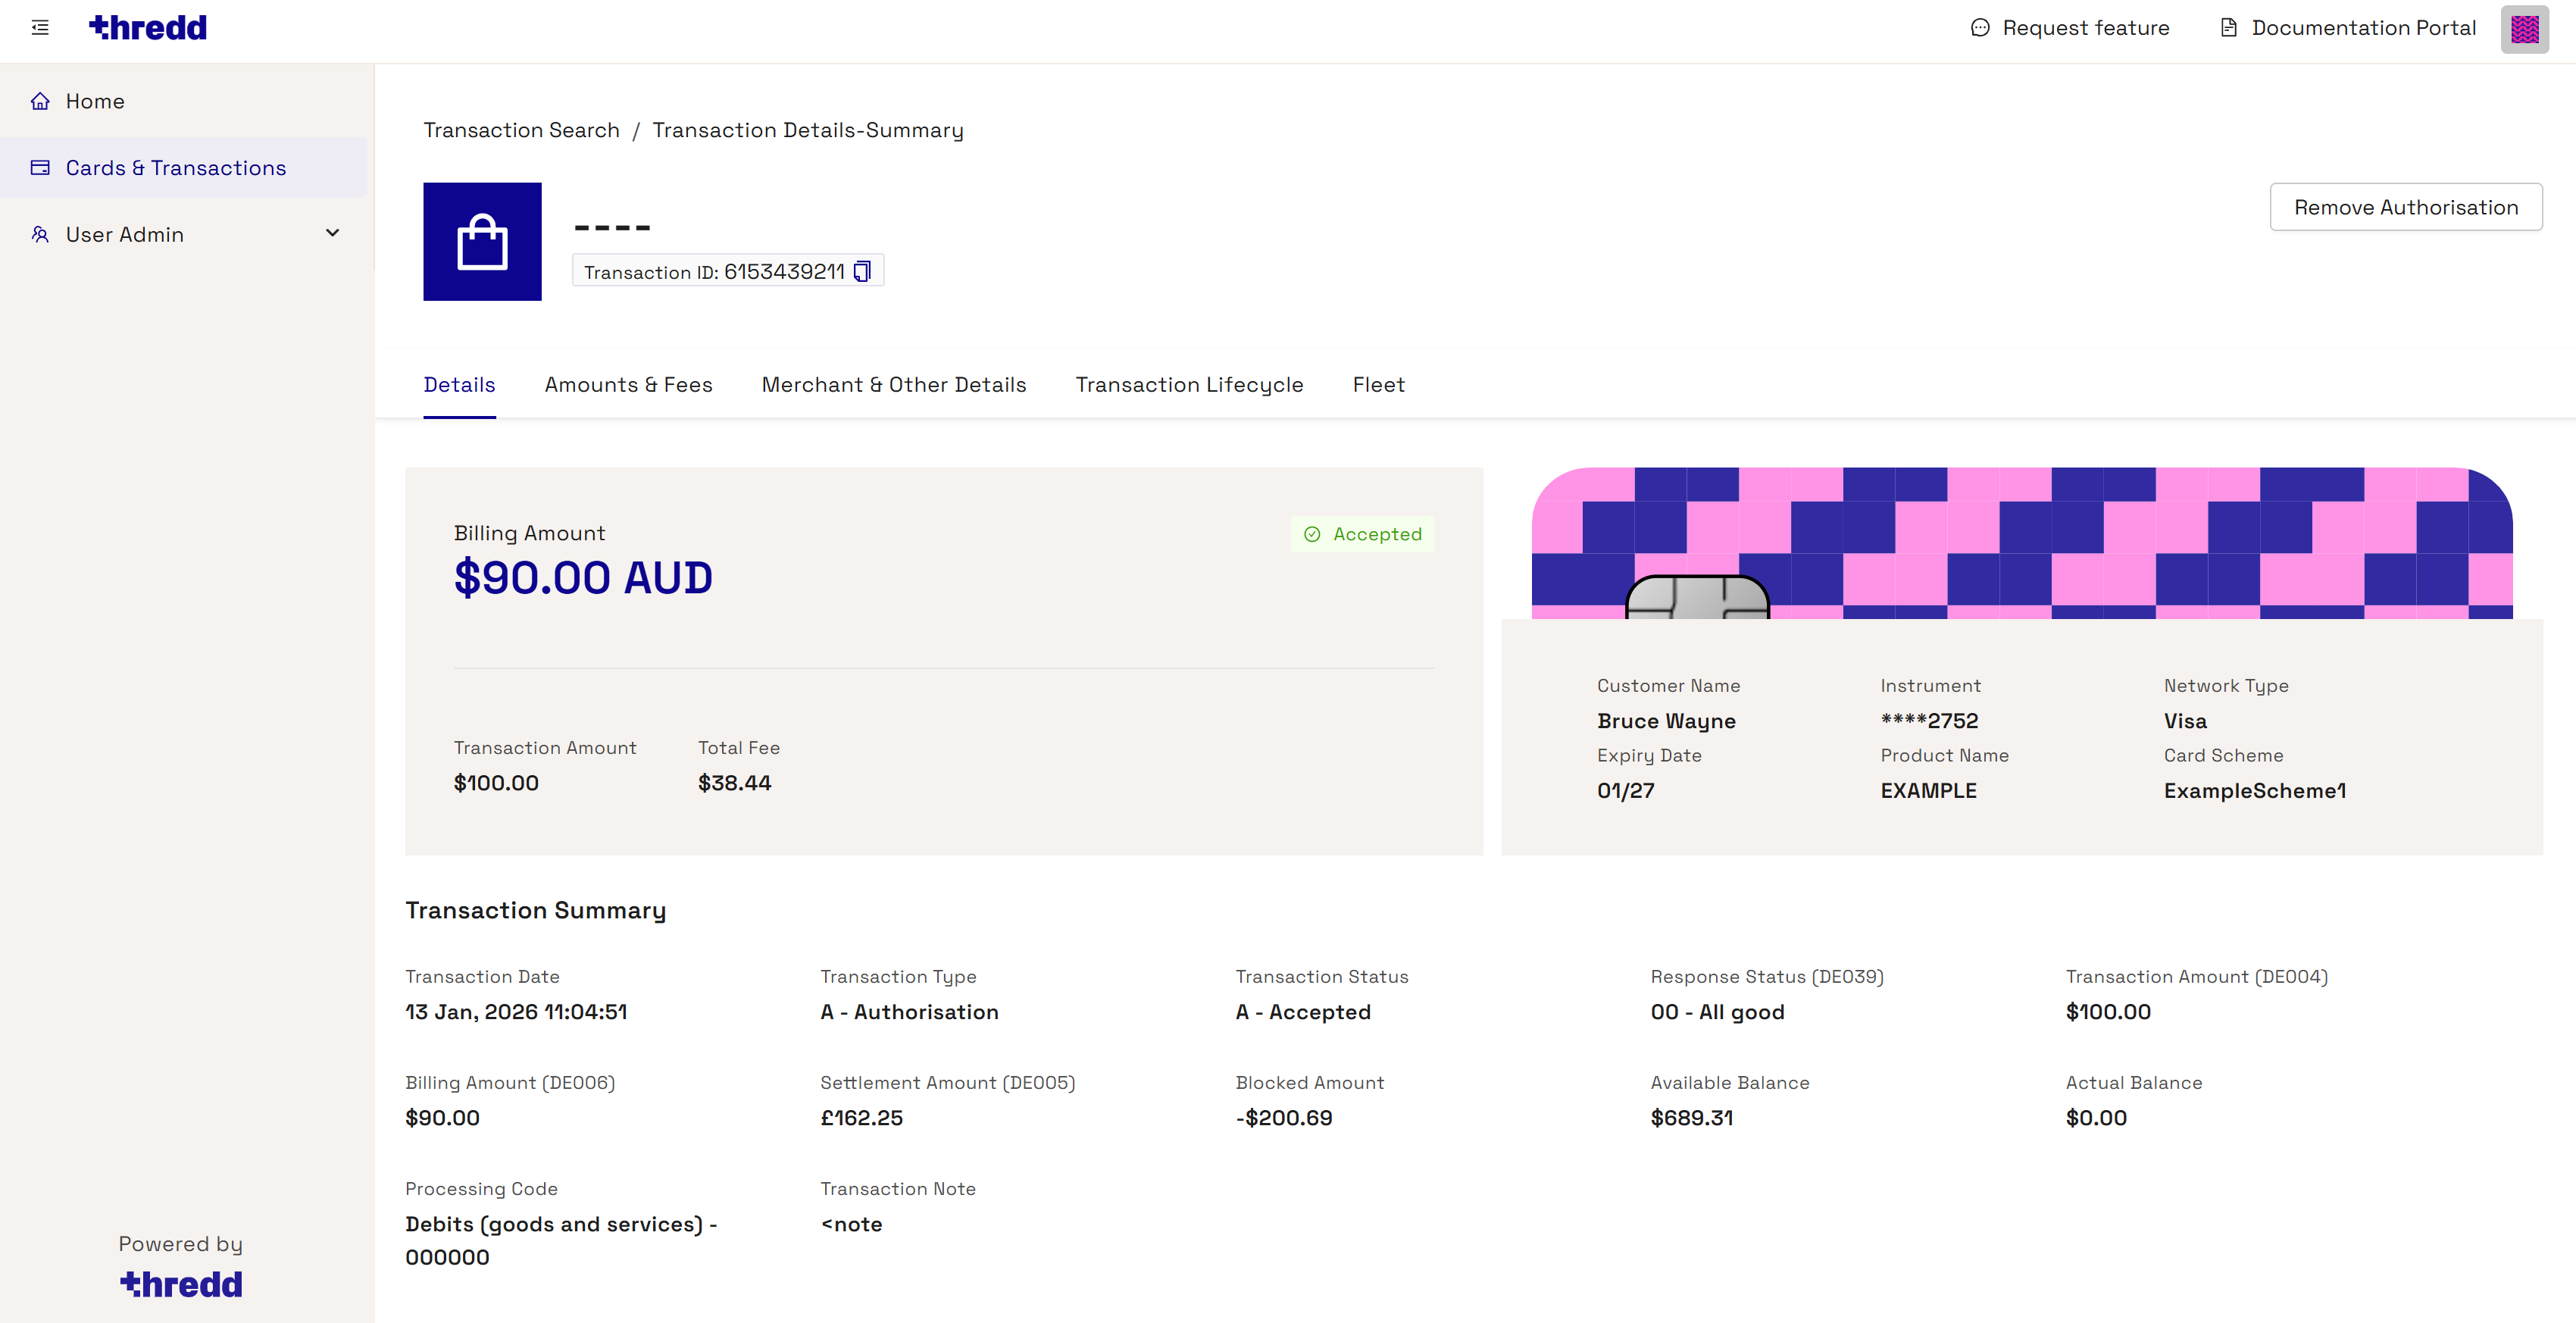
You can view information on a transaction, including the total amount and its breakdown. The following example shows a total amount of 2.00 that consists of a Fixed Fee of 1.00 and a Domestic Fixed Fee of 1.00.
- If you know the transaction number, click Transaction ID and enter it from the Home page and Click Search.
-
To perform an advanced transaction search from the Home page:
-
Click Advanced Search.
-
Click the Transactions tab.
-
Enter the details in any of the following fields:
-
Transaction ID
-
Token
-
Trace ID
-
Date
-
-
- To perform an advanced transaction search, click Advanced Transaction Search and enter any of the following details:
- Transaction Type
- Transaction Status
- Note
- Merchant Location
- Processing Code
- Billing Amount and Currency
- Transaction Amount and Currency
- Network Type
- Card Type
- Click Search. The results of the search display, with all transactions matching the criteria displayed below the Transaction Search options.
- Click on a transaction item.
- Click the Amounts and Fees tab. The following example shows a breakdown of fees on a transaction.
![]()
Time lags in a presentment may be due to delays from the merchant or the acquirer in sending the presentment.
The blocked amount is the total amount reserved to complete transactions.
- If you know the transaction number, click Transaction ID and enter it from the Home page and Click Search.
-
To perform an advanced transaction search from the Home page:
-
Click Advanced Search.
-
Click the Transactions tab.
-
Enter the details in any of the following fields:
-
Transaction ID
-
Token
-
Trace ID
-
Date
-
-
- To perform an advanced transaction search, click Advanced Transaction Search and enter any of the following details:
- Transaction Type
- Transaction Status
- Note
- Merchant Location
- Processing Code
- Billing Amount and Currency
- Transaction Amount and Currency
- Network Type
- Card Type
- Click Search. The results of the search display, with all transactions matching the criteria displayed below the Transaction Search options.
- Click on a transaction item. Under the Details tab observe the amount under Blocked Amount.

An available balance is the amount on the card that the cardholder can use immediately.
The billing amount is the sum of money billed for a transaction by a merchant in the card's currency. While a transaction amount is the sum of money recorded when the transaction takes place in the local currency. The billing amount may consider the exchange rates.
-
Perform an advanced transaction search.
-
Under the Card Type list, Select Multi-FX.
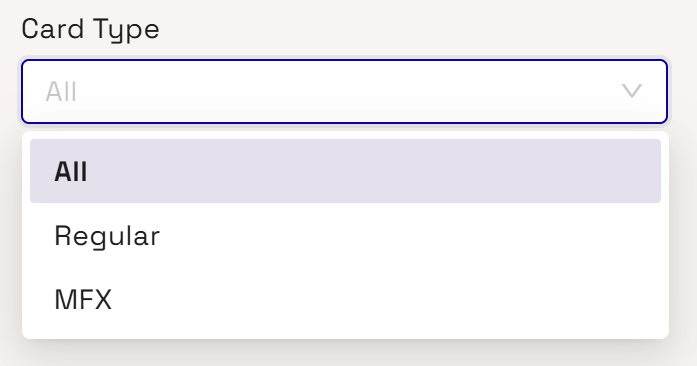
-
Click Search. Transactions that have the Multi-FX card type appear.
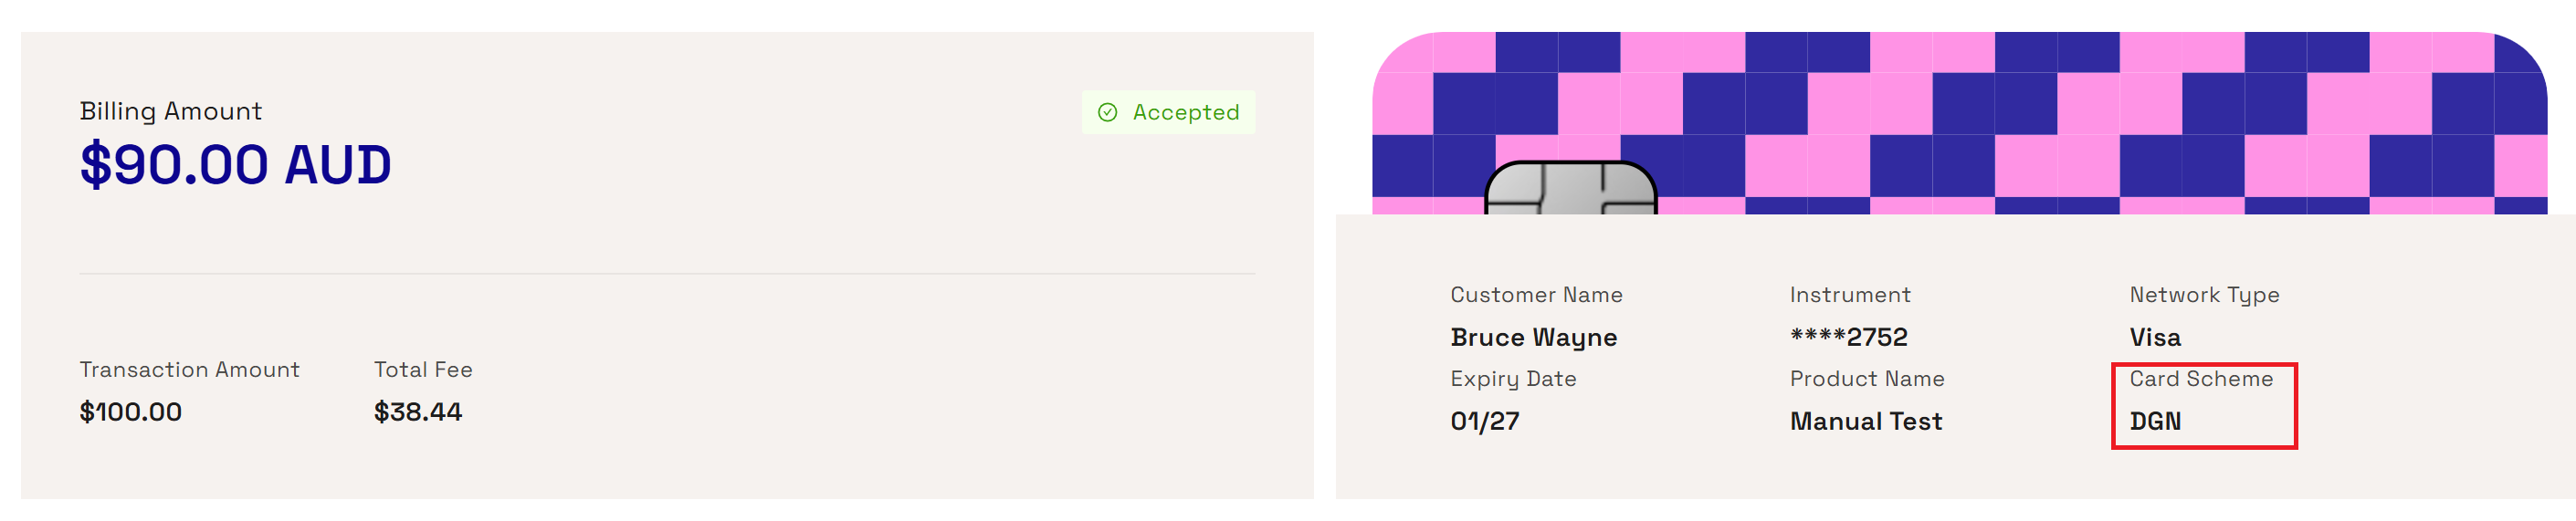
As well as Mastercard and Visa, Thredd supports the processing of debit cards on the DGN network. If a card token uses the DGN network, Transaction Summary information shows the card network associated with the card transaction as DGN.
- If you know the transaction number, click Transaction ID and enter it from the Home page and Click Search.
-
To perform an advanced transaction search from the Home page:
-
Click Advanced Search.
-
Click the Transactions tab.
-
Enter the details in any of the following fields:
-
Transaction ID
-
Token
-
Trace ID
-
Date
-
-
- To perform an advanced transaction search, click Advanced Transaction Search and enter any of the following details:
- Transaction Type
- Transaction Status
- Note
- Merchant Location
- Processing Code
- Billing Amount and Currency
- Transaction Amount and Currency
- Network Type
- Card Scheme
- Click Search. The results of the search display, with all transactions matching the criteria displayed below the Transaction Search options.
- Click on a transaction entry.
- Under the Details tab, note that DGN appears under the Card Scheme field.
Thredd Portal: Cards and Transaction Management lists the transactions that have been sent to your systems through EHI. EHI offers a way to exchange transactional data between the Thredd processing system and the Program Manager's externally hosted systems. EHI provides a real-time transaction notification data feed and payment authorisation control.
- If you know the transaction number, click Transaction ID and enter it from the Home page and Click Search.
-
To perform an advanced transaction search from the Home page:
-
Click Advanced Search.
-
Click the Transactions tab.
-
Enter the details in any of the following fields:
-
Transaction ID
-
Token
-
Trace ID
-
Date
-
-
- To perform an advanced transaction search, click Advanced Transaction Search and enter any of the following details:
- Transaction Type
- Transaction Status
- Note
- Merchant Location
- Processing Code
- Billing Amount and Currency
- Transaction Amount and Currency
- Network Type
- Card Type
- Click Search.
- Click on a transaction entry.
- View the list of transactions. The Transaction Note column indicates the transactions that are sent to EHI.
Transactions that are sent to EHI may be approved or rejected by EHI.
You can find Information on how the transaction was authenticated, the cardholder present/not present status and fraud details.
- If you know the transaction number, click Transaction ID and enter it from the Home page and Click Search.
-
To perform an advanced transaction search from the Home page:
-
Click Advanced Search.
-
Click the Transactions tab.
-
Enter the details in any of the following fields:
-
Transaction ID
-
Token
-
Trace ID
-
Date
-
-
- To perform an advanced transaction search, click Advanced Transaction Search and enter any of the following details:
- Transaction Type
- Transaction Status
- Note
- Merchant Location
- Processing Code
- Billing Amount and Currency
- Transaction Amount and Currency
- Network Type
- Card Type
- Click Search.
- Click on a transaction entry.
- Click the Merchant & Other Details tab.
- Scroll down view the values in the POS Data (DE061) field.
-
Click on the expand arrow for Thredd POS Data. Details of the POS transaction appear in a window.
You can check if Fraud Transaction Monitoring was used on a transaction by checking the Note entry for a transaction in Thredd Portal. Fraud Transaction Monitoring enables the configuration of fraud rules where alerts are triggered under specific conditions.
- If you know the transaction number, click Transaction ID and enter it from the Home page and Click Search.
-
To perform an advanced transaction search from the Home page:
-
Click Advanced Search.
-
Click the Transactions tab.
-
Enter the details in any of the following fields:
-
Transaction ID
-
Token
-
Trace ID
-
Date
-
-
- To perform an advanced transaction search, click Advanced Transaction Search and enter any of the following details:
- Transaction Type
- Transaction Status
- Note
- Merchant Location
- Processing Code
- Billing Amount and Currency
- Transaction Amount and Currency
- Network Type
- Card Type
- Click Search.
- Click on a transaction entry.
- Within the Details tab under Transaction Note, check for details indicating that Fraud Transaction Monitoring was run for the transaction.
- If you know the transaction number, click Transaction ID and enter it from the Home page and Click Search.
-
To perform an advanced transaction search from the Home page:
-
Click Advanced Search.
-
Click the Transactions tab.
-
Enter the details in any of the following fields:
-
Transaction ID
-
Token
-
Trace ID
-
Date
-
-
- To perform an advanced transaction search, click Advanced Transaction Search and enter any of the following details:
- Transaction Type
- Transaction Status
- Note
- Merchant Location
- Processing Code
- Billing Amount and Currency
- Transaction Amount and Currency
- Network Type
- Card Type
- Click Search.
- Click on a transaction entry where the Transaction Type is authorisation.
- Click Remove Authorisation.

-
Review the change, and enter text in the Notes field if required.
-
Click Save.
You can find details of the merchant that accepted the transaction, including the name and location of the merchant. There are also details on the transaction that took place at the merchant. For example, POS entry mode (DE022) includes information on how the cardholder was authenticated and the cardholder present/not present status.
- If you know the transaction number, click Transaction ID and enter it from the Home page and Click Search.
-
To perform an advanced transaction search from the Home page:
-
Click Advanced Search.
-
Click the Transactions tab.
-
Enter the details in any of the following fields:
-
Transaction ID
-
Token
-
Trace ID
-
Date
-
-
- To perform an advanced transaction search, click Advanced Transaction Search and enter any of the following details:
- Transaction Type
- Transaction Status
- Note
- Merchant Location
- Processing Code
- Billing Amount and Currency
- Transaction Amount and Currency
- Network Type
- Card Type
- Click Search.
- Click on a transaction entry.
- Click the Merchant & Other Details tab.
- Find details of the merchant under Merchant Details. These include:
-
Merchant name
-
City
-
County
-
Postcode
-
Region
-
Street
-
Phone
-
Contact
-
Merchant website
-
POS Entry Mode (DE022)
-
Network Reference ID (DE123)
-
Merchant Category Code (MCC)
-
Card Acceptor Name Location (DE043)
-
Till Time
-
POS Data (DE061)
-
AID
-
Card Acceptor ID Code (DE042)
-
Card Acceptor Terminal ID (DE041)
-
Tax Id
You can export transactions that have been filtered from a transaction search to a .CSV file. The .CSV file is available for download.
- If you know the transaction number, click Transaction ID and enter it from the Home page and Click Search.
-
To perform an advanced transaction search from the Home page:
-
Click Advanced Search.
-
Click the Transactions tab.
-
Enter the details in any of the following fields:
-
Transaction ID
-
Token
-
Trace ID
-
Date
-
-
- To perform an advanced transaction search, click Advanced Transaction Search and enter any of the following details:
- Transaction Type
- Transaction Status
- Note
- Merchant Location
- Processing Code
- Billing Amount and Currency
- Transaction Amount and Currency
- Network Type
- Card Type
- Click Search.
- Click Export. This button is next to the Columns button. Clicking Export starts the process of exporting.
![]()
Exporting transactions to a CSV file is available for all Thredd Portal roles except Read-Only.
Transaction Declines
Thredd Portal: Cards and Transaction Management allows you to find out details on various types of transaction declines.
From the list of transaction results, Thredd Portal shows entries with the Declined status in the Transaction Status column.
You can also find information on why the transactions was declined which is recorded in the Transaction Note. This includes transactions where the decline was initiated by either Thredd or the client (your programme). Declines initiated by the client include EHI transactions.
The cardholder transaction note shows as "disallowed list" because the merchant (card acceptor id) is not allowed for the transaction. This is per the card acceptor disallowed list assigned to the card.
Solution: You can associate the card to a card allow list that allows transactions from the merchant through the below steps:
-
Identify the card number for the transaction.
-
Go to Card Actions > Edit Card Configurations.
-
Select a Card Allow List.
-
To confirm the change, click Review and Save.
-
Check the updated details and click Save.
Solution: Load funds onto the card.
-
Identify the card token for the transaction.
-
Go to Card Actions > Card Load/Unload.
-
In the window, select to load the card and click Next.
-
Review the balances for loading and click Next.
-
To confirm the change, click Review and Save.
To resolve this issue, you may need to change the Group Usage for the card. You should confirm that this is the right course of action, as it may require that you receive sign-off from the Issuer.
-
Identify the card token that you identified for the transaction.
-
Go to Card Actions > Edit Card Configurations.
-
Enter a different Group Usage.
-
Review the balances for loading and click Next.
-
To confirm the change, click Review and Save.
You should follow the below steps:
-
Enter the card token that you identified for the transaction.
-
Check the date on the Expired field on the image of the card against the Card Status, which shows as Expired.
-
Advise the cardholder on next steps, for example, how to renew the card.
A transaction may be declined due to fraud. You may need to contact Thredd to investigate the fraud. You can also change the status of the card from 05 - Do Not Honour to 00- Allgood through the following steps:
-
Enter the card token that you identified for the transaction.
-
Check the transaction list to identify entries in the Notes field indicating that fraud has been captured in Thredd's Fraud Transaction Monitoring system.
-
To allow the transaction to be accepted, go to Card Actions > Change Card Status.
-
Click Next.
-
Select the following status code from the check box: 00 - Allgood.
-
Click Next.
-
Click Save.
If the transaction is declined because it failed the MCC group check, you should consider permitting transactions from the MCC by updating the entry in Group MCC. Contact Thredd to update the MCC group.
To change the group limit, do the following:
-
Enter the card token for the identified transaction.
-
To allow the transaction to be accepted, go to Card Actions > Edit Cardholder Configurations.
-
Under the Edit Card Configurations screen for the token, update the group in Group MCC.
-
To confirm the change, click Review and Save.
-
Check the updated details and click Save.
This description indicates that the authorisation value (bill amount) is higher than the maximum amount per transaction limit in the Limit group assigned to the card. You can update the transaction limit setting on the card to allow higher value transactions that do not exceed the limit.
To change the group limit, do the following:
-
Enter the card token for the identified transaction.
-
To allow the transaction to be accepted, go to Card Actions > Edit Cardholder Configurations.
-
Under the Edit Card Configurations screen for the token, update the group in Group Limit.
-
To confirm the change, click Review and Save.
-
Check the updated details and click Save.
This reason indicates that EHI didn't respond in the agreed time where a timeout happened.
If the client has selected Gateway Processing with STIP (Mode 4 ), Thredd approves or declines based on the product configuration, as the host is unavailable. If another EHI mode is selected, such as Gateway Processing (Mode 1) or Cooperative Processing (Mode 2), Thredd declines the transaction. You can do the following:
-
Investigate why the External Host did not respond in time.
-
Contact Thredd to assist in any further investigation.
This indicates that the authorisation was declined by your systems which are connected to EHI. Check your systems for the decline reason.
Check the external host for the decline reason.
Smart Client Migration
If you are a Smart Client user, you will need to migrate to Thredd Portal: Cards and Transaction Management. Smart Client provides the same card management functions, but using a legacy Windows interface.
Q. Migration normally takes a few days to complete. This requires setup which Thredd will complete. However, clients will need to provide details to help Thredd perform the setup steps.
Yes, you can continue to use Smart Client during the migration period.
Thredd Portal: Cards and Transaction Management is been designed with self-service in mind. Users can enter their email and be provisioned onto the system by the User Admin role within your organisation. You are in control of who has access to which roles within Thredd Portal.
Secure Access with SSO
You will need to configure secure access to Thredd Portal using Thredd's Identity Provider (IDP). The steps are as follows:
- Thredd adds a ‘User Admin’ for your organisation to the Identity Provider (this information is supplied by the client).
- You can then add your organisation, assign roles and add users in the Identity Provider - this is done by the ‘User Admin’ role which you have chosen in your organisation.
For more information, see the Connecting to Thredd Guide.
A member of our Engineering Security Team can be able to support you during your SSO integration should this be required, however, the process has been designed to be completed with minimal set-up.
No, all clients must connect to Thredd Portal using Single Sign On (SSO).
Feature Requests
If you want any new features or updates to existing ones, you can enter details in the Feature Request form in Thredd Portal.
Fill in details on the Feature Request form. This includes the:
- Priority level of the issue, for example, Major if the change request is important.
- Description of the problem that you face when using the current Thredd Portal functionality.
- Description of the feature that you require to address your needs.